
![]()
![]()

这个库是关于网络请求的,还带了二十一点、轮盘赌和掷骰子游戏!
使用它,你就能将庞大的 API 层代码转换为令人惊叹的便捷控制器,轻松进行可维护的网络请求!
对所有与 API 请求相关的内容使用 Codable 模型
- json payload
- url-encoded payload
- multipart payload
- plain 和 json response
- url query
- headers
惊叹了吗?这仅仅是你能从这个库获得的很小一部分! 🍻
APIRequest<ResponseModel>("endpoint").onSuccess { model in
    //here's your decoded model!
    //no need to check http.statusCode, I already did it for you! By default it's 200 OK
    //of course you can choose which statusCode is equal to success (look at the `POST` and `DELETE` examples below)
}
APIRequest<ResponseModel>("endpoint", payload: payloadModel)
    .method(.post)
    .desiredStatusCode(.created) //201 CREATED
    .onSuccess { model in
    //here's your decoded model!
    //success was determined by comparing desiredStatusCode with http.statusCode
}
APIRequest<Nothing>("endpoint")
    .method(.delete)
    .desiredStatusCode(.noContent) //204 NO CONTENT
    .onSuccess { _ in
    //here's empty successful response!
    //success was determined by comparing desiredStatusCode with http.statusCode
}
你可以一个接一个地运行最多 10 个请求!
API.employee.all()
    .and(API.office.all())
    .and(API.car.all())
    .and(API.event.all())
    .and(API.post.all())
    .onError { error in
        print(error.description)
    }.onSuccess { employees, offices, cars, events, posts in
   // do what you want with received results!!! 🍻
}
或者你可以同时运行无限数量的请求,如果你只需要一个 completion handler。
[API.employee.all(), API.office.all(), API.car.all()].flatten().onError {
    print(error.description)
}.onSuccess {
    print("flatten finished!")
}
要并发运行它们,只需添加 .concurrent(by: 3) 即可同时运行 3 个
当然,你还可以发送 PUT 和 PATCH 请求,发送带有上传进度回调的 multipart codable 结构体,捕获错误,甚至为每个端点重新定义错误描述。惊叹了吗? 😃 让我们阅读下面的整个自述文件! 🍻
CodyFire 可以通过 CocoaPods 和 SPM 获得。
要安装它,只需将以下行添加到你的 Podfile 中
pod 'CodyFire', '~> 1.15.4'
或者你在寻找响应式代码支持?我也有! 🍺
- 对于 RxSwift https://github.com/MihaelIsaev/RxCodyFire
pod 'RxCodyFire', '~> 1.1.0'
# no need to install `CodyFire` cause it's in dependencies
使用这个 pod,你应该始终只导入 RxCodyFire,并且每个 APIRequest 都将具有 .observable
- 对于 ReactiveCocoa https://github.com/MihaelIsaev/ReactiveCodyFire
pod 'ReactiveCodyFire', '~> 1.1.0'
# no need to install `CodyFire` cause it's in dependencies
使用这个 pod,你应该始终只导入 ReactiveCodyFire,并且每个 APIRequest 都将具有 .signalProducer
CodyFire 会自动检测你所在的运行环境,所以我建议你一定要使用这个很棒的功能 👏
import CodyFire

@UIApplicationMain
class AppDelegate: UIResponder, UIApplicationDelegate {
    func application(_ application: UIApplication, didFinishLaunchingWithOptions launchOptions: [UIApplication.LaunchOptionsKey : Any]? = nil) -> Bool {
        let dev = CodyFireEnvironment(baseURL: "https://:8080")
        let testFlight = CodyFireEnvironment(baseURL: "https://stage.myapi.com")
        let appStore = CodyFireEnvironment(baseURL: "https://api.myapi.com")
        CodyFire.shared.configureEnvironments(dev: dev, testFlight: testFlight, appStore: appStore)
        //Also if you want to be able to switch environments manually just uncomment the line below (read more about that)
        //CodyFire.shared.setupEnvByProjectScheme()
        return true
    }
}
是不是很酷? 😏
或者你可以为每个 APIRequest 设置不同的 Server URL
let server1 = ServerURL(base: "https://server1.com", path: "v1")
let server2 = ServerURL(base: "https://server2.com", path: "v1")
let server3 = ServerURL(base: "https://server3.com")
然后像这样初始化你的 APIRequests 🔥
APIRequest(server1, "endpoint", payload: payloadObject)
APIRequest(server2, "endpoint", payload: payloadObject)
APIRequest(server3, "endpoint", payload: payloadObject)
或者在某些情况下,你甚至可以这样做 😏
APIRequest("endpoint", payload: payloadObject).serverURL(server1)
我保证这是你梦想中的 API 代码架构,现在梦想成真了!
class API {
    typealias auth = AuthController
    typealias task = TaskController
}
API/Controllers/Auth/Auth.swift
class AuthController {}
API/Controllers/Task/Task.swift
class TaskController {}
API/Controllers/Auth/Auth+Login.swift
import CodyFire
extension AuthController {
  struct LoginRequest: JSONPayload {
        let email, password: String
        init (email: String, password: String) {
            self.email = email
            self.password = password
        }
    }

    struct LoginResponse: Codable {
        var token: String
    }

    static func login(_ request: LoginRequest) -> APIRequest<LoginResponse> {
        return APIRequest("login", payload: request).method(.post).addCustomError(.notFound, "User not found")
    }
}
API/Controllers/Auth/Auth+Login.swift
import CodyFire
extension AuthController {
    struct LoginResponse: Codable {
        var token: String
    }

    static func login(email: String, password: String) -> APIRequest<LoginResponse> {
        return APIRequest("login").method(.post).basicAuth(email: email, password: password)
            .addCustomError(.notFound, "User not found")
    }
}
API/Controllers/Task/Task+Get.swift
import CodyFire
extension TaskController {
    struct Task: Codable {
        var id: UUID
        var name: String
    }

    struct ListQuery: Codable {
        var offset, limit: Int
        init (offset: Int, limit: Int) {
            self.offset = offset
            self.limit = limit
        }
    }

    static func get(_ query: ListQuery? = nil) -> APIRequest<[Task]> {
        return APIRequest("task").query(query)
    }

    static func get(id: UUID) -> APIRequest<Task> {
        return APIRequest("task/" + id.uuidString)
    }
}
API/Controllers/Task/Task+Create.swift
import CodyFire
extension TaskController {
    struct CreateRequest: JSONPayload {
        var name: String
        init (name: String) {
            self.name = name
        }
    }

    static func create(_ request: CreateRequest) -> APIRequest<Task> {
        return APIRequest("post", payload: request).method(.post).desiredStatusCode(.created)
    }
}
API/Controllers/Task/Task+Edit.swift
import CodyFire
extension TaskController {
    struct EditRequest: JSONPayload {
        var name: String
        init (name: String) {
            self.name = name
        }
    }

    static func create(id: UUID, request: EditRequest) -> APIRequest<Task> {
        return APIRequest("post/" + id.uuidString, payload: request).method(.patch)
    }
}
API/Controllers/Task/Task+Delete.swift
import CodyFire
extension TaskController {
    static func delete(id: UUID) -> APIRequest<Nothing> {
        return APIRequest("post/" + id.uuidString).method(.delete).desiredStatusCode(.noContent)
    }
}
API.auth.login(email: "test@mail.com", password: "qwerty").onError { error in
    switch error.code {
    case .notFound: print("User not found")
    default: print(error.description)
    }
}.onSuccess { token in
    print("Received auth token: "+ token)
}
API.task.get().onError { error in
    print(error.description)
}.onSuccess { tasks in
    print("received \(tasks.count) tasks")
}
API.task.create(TaskController.CreateRequest(name: "Install CodyFire")).onError { error in
    print(error.description)
}.onSuccess { task in
    print("just created new task: \(task)")
}
let taskId = UUID()
API.task.delete(id: taskId).onError { error in
    print(error.description)
}.onSuccess { _ in
    print("just removed task with id: \(taskId)")
}
//declare a PostController
class PostController()
extension PostController {
    struct CreateRequest: MultipartPayload {
        var text: String
        var tags: [String]
        var images: [Attachment]
        var video: Data
        init (text: String, tags: [String], images: [Attachment], video: Data) {
            self.text = text
            self.tags = tags
            self.images = images
            self.video = video
        }
    }

    struct PostResponse: Codable {
        let id: UUID
        let text: String
        let tags: [String]
        let linksToImages: [String]
        let linkToVideo: String
    }

    static func create(_ request: CreateRequest) -> APIRequest<PostResponse> {
        return APIRequest("post", payload: request).method(.post)
    }
}

//then somewhere send creation request!

let videoData = FileManager.default.contents(atPath: "/path/to/video.mp4")!
let imageAttachment = Attachment(data: UIImage(named: "cat")!.jpeg(.high)!,
                                 fileName: "cat.jpg",
                                 mimeType: .jpg)
let payload = PostController.CreateRequest(text: "CodyFire is awesome",
                                           tags: ["codyfire", "awesome"],
                                           images: [imageAttachment],
                                           video: videoData)
API.post.create(payload).onProgress { progress in
    print("tracking post uploading progress: \(progress)")
}.onError { error in
    print(error.description)
}.onSuccess { createdPost in
    print("just created post: \(createdPost)")
}
很简单吧? 🎉
为此,我们有一个全局 header 包装器,它会被调用于每个请求。
你需要声明它,例如在 AppDelegate 中的某个地方。
有两种选择
- 使用 Codable 模型作为 header(推荐)
CodyFire.shared.fillCodableHeaders = {
    struct Headers: Codable {
        var Authorization: String? //NOTE: nil values will be excluded
        var anythingElse: String
    }
    return Headers(Authorization: nil, anythingElse: "hello")
}
- 使用 [String: String] 字典
CodyFire.shared.fillHeaders = {
    guard let apiToken = LocalAuthStorage.savedToken else { return [:] }
    return ["Authorization": "Bearer \(apiToken)"]
}
同样,在 AppDelegate 中的某个地方像这样声明它 CodyFire.shared.unauthorizedHandler = { //踢出用户 }
.onNetworkUnavailable {
    print("unfortunately there're no internet connection!")
}
.onRequestStarted {
    print("request started normally")
}
.avoidLogError()
通常服务器会响应 200 OK,CodyFire 默认情况下期望收到 200 OK 来调用 onSuccess 处理程序。
你可能需要指定另一个代码,例如某些 POST 请求的 201 CREATED。
.desiredStatusCode(.created)
或者你甚至可以设置你自己的自定义代码
.desiredStatusCode(.custom(777))
.headers(["myHeader":"myValue"])
//or for basic auth
.basicAuth(email: "", password: "")
你可以使用:GET, POST, PUT, PATCH, DELETE, HEAD, TRACE, CONNECT, OPTIONS
这是一个非常有用的功能,我建议在每个 iOS 项目中使用它!
创建三个 schemes,命名为:Development, TestFlight, AppStore,就像下面的截图一样 
提示:确保将它们标记为 Shared,以便在 git 中拥有它们
然后在每个 scheme 的 Arguments 选项卡中添加一个名为 env 的 Environment variable,并使用以下值之一:dev, testFlight, appStore。
请看下面的示例 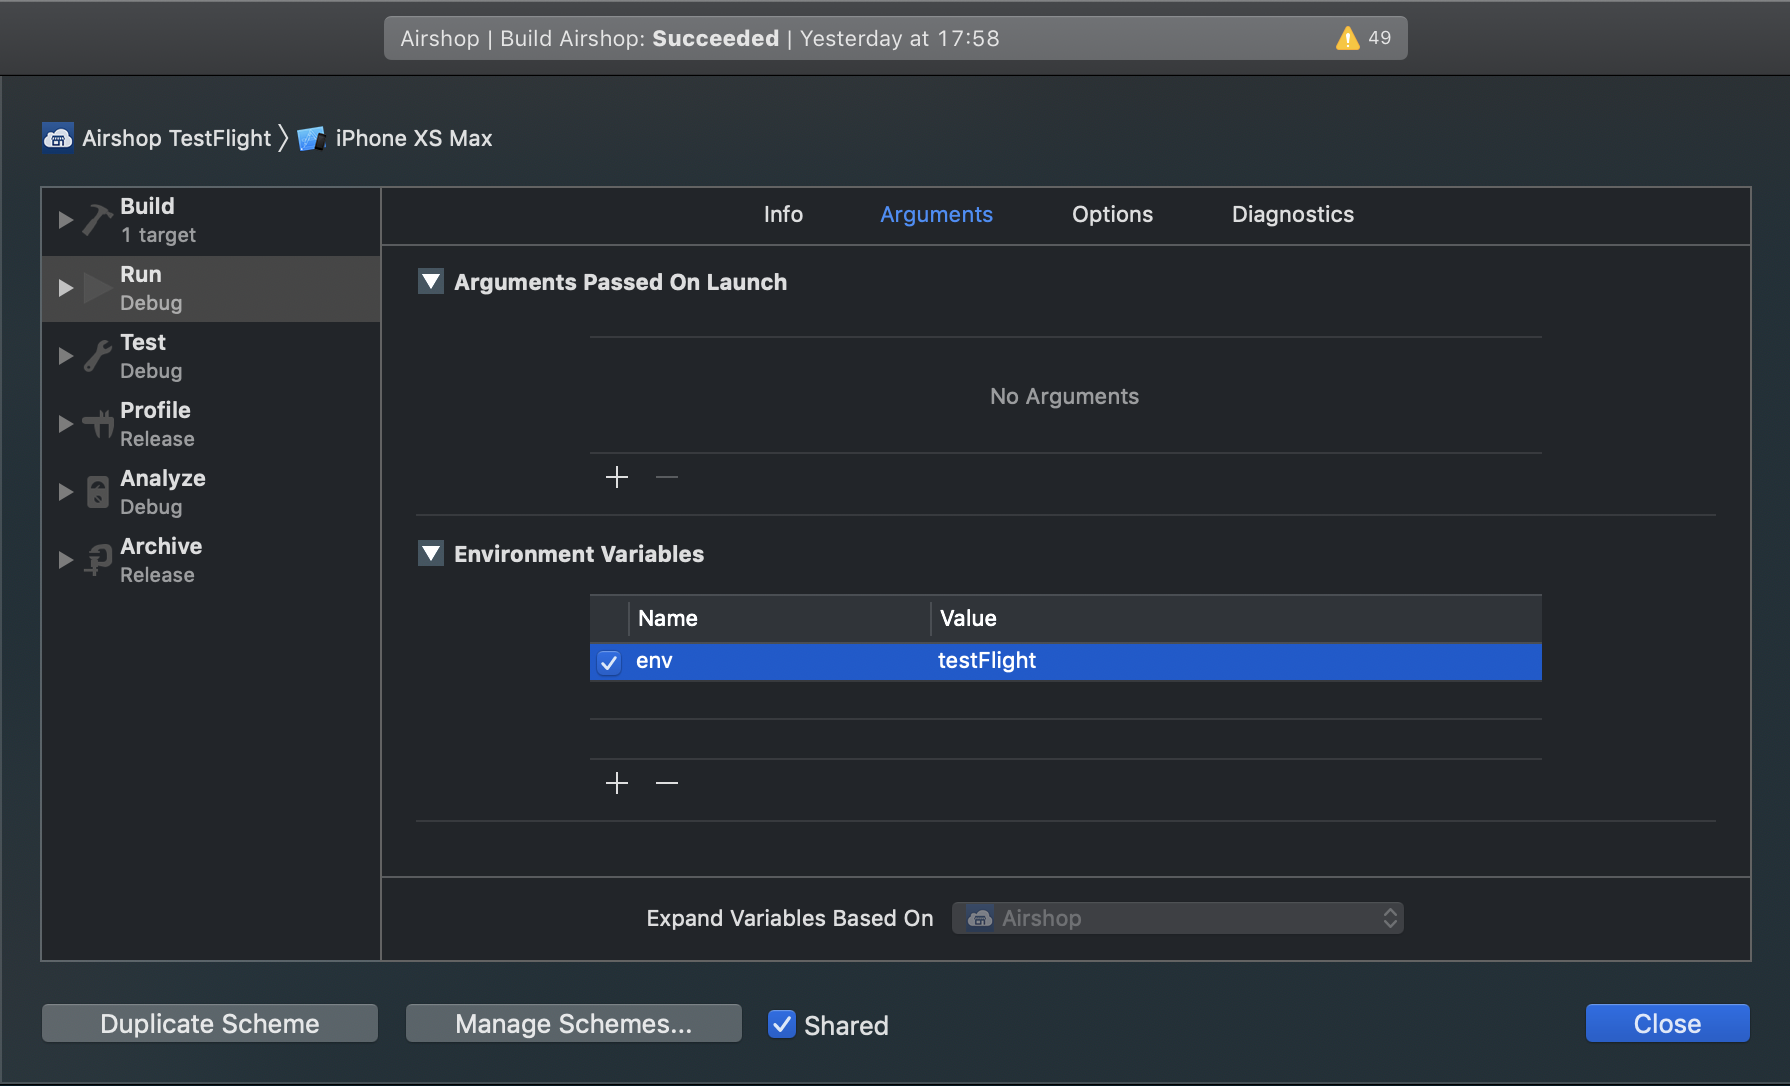
然后在 AppDelegate.didFinishLaunchingWithOptions 中添加
CodyFire.shared.setupEnvByProjectScheme()
全部完成,现在你可以轻松切换环境了!
有时对于 DELETE 或 PATCH 请求很有用
APIRequest<Nothing>("endpoint").method(.delete).execute()
let request = APIRequest("").execute()
request.cancel()
你可以处理取消
.onCancellation {
    print("request was cancelled :(")
}
你可以定义你自己的自定义错误,全局或每个请求。 onError 块包含带有 StatusCode 枚举、错误描述和原始响应 Data 的 NetworkError 对象。你可以将错误描述更改为任何你想要的错误代码。默认情况下,已经为常见错误定义了一些良好的描述。
让我们看看如何使用强大的 onError 块
.onError { error in
    switch error.code {
    case .notFound: print("It's not found :(")
    case .internalServerError: print("Oooops... Something really went wrong...")
    case .custom(let code): print("My non-standard-custom error happened: " + error.description)
    case .unknown(let code): print("Totally unknown error happened: " + error.description)
    default:
        print("Another error happened: " + error.description)
        if let raw = error.raw, let rawResponse = String(data: raw, encoding: .utf8) {
            print("Raw response: " + rawResponse)
        }
    }
}
不仅仅如此!!!在你的控制器中声明 APIRequest 时,你可以添加你自己的自定义错误!!! 🙀
APIRequest("login")
    .method(.post)
    .basicAuth(email: "sam@mail.com", password: "qwerty")
    .addError(.notFound, "User not found")
我相信这非常棒而且有用! 终于可以在一个地方声明很多东西了! 🎉
.responseTimeout(30) //request timeout set for 30 seconds
当然,你可以捕获超时
.onTimeout {
    //timeout happened :(
}
如果你想确保你的请求需要 2 秒或更长时间(不要太快 😅)你可以这样做
.additionalTimeout(2)
例如,如果你的请求将在 0.5 秒内执行,则 onSuccess 处理程序将在那之后 1.5 秒才触发,但如果你的请求需要超过 2 秒,则 onSuccess 处理程序将立即触发
你的 struct/class 应该符合 MultipartPayload 协议
struct SomePayload: MultipartPayload {
    let name: String
    let names: [String]
    let date: Date
    let dates: [Dates]
    let number: Double
    let numbers: [Int]
    let attachment: Data
    let attachments: [Data]
    let fileAttachment: Attachment
    let fileAttachments: [Attachment]
}
你可以让你的 struct/class 符合:FormURLEncodedPayload, MultipartPayload, 和 JSONPayload
你的 struct/class 应该符合 JSONPayload 协议
struct SomePayload: JSONPayload {
    let name: String
    let names: [String]
    let date: Date
    let dates: [Dates]
    let number: Double
    let numbers: [Int]
}
你的 struct/class 应该符合 FormURLEncodedPayload 协议
struct SomePayload: FormURLEncodedPayload {
    let name: String
    let names: [String]
    let date: Date
    let dates: [Dates]
    let number: Double
    let numbers: [Int]
}
你的 struct/class 应该符合 Codable 协议
struct SomePayload: Codable {
    let name: String
    let names: [String]
    let date: Date
    let dates: [Dates]
    let number: Double
    let numbers: [Int]
}
我们的 DateCodingStrategy 支持
- secondsSince1970
- millisecondsSince1970
- formatted(customDateFormatter: DateFormatter) 默认情况下,所有日期都采用
yyyy-MM-dd'T'HH:mm:ss'Z'格式
你在这里有一些有趣的选择
- 你可以设置全局日期解码器/编码器
CodyFire.shared.dateEncodingStrategy = .secondsSince1970
let customDateFormatter = DateFormatter()
CodyFire.shared.dateDecodingStrategy = .formatted(customDateFormatter)
- 你可以为控制器中的请求设置日期解码器/编码器
APIRequest().dateDecodingStrategy(.millisecondsSince1970).dateEncodingStrategy(.secondsSince1970)
- 或者你甚至可以为每种 payload 类型使用不同的日期编码器/解码器(优先级最高)
struct SomePayload: JSONPayload, CustomDateEncodingStrategy, CustomDateDecodingStrategy {
   var dateEncodingStrategy: DateCodingStrategy
   var dateDecodingStrategy: DateCodingStrategy
}
例如,在 AppDelegate 中,你可以设置日志记录模式
CodyFire.shared.logLevel = .debug
CodyFire.shared.logLevel = .error
CodyFire.shared.logLevel = .info
CodyFire.shared.logLevel = .off
你也可以设置日志处理程序
CodyFire.shared.logHandler = { level, text in
    print("manually printing codyfire error: " + text)
}
默认情况下,对于 AppStore,日志级别为 .off
很简单
#if DEBUG
    //DEV environment
#else
    if Bundle.main.appStoreReceiptURL?.lastPathComponent == "sandboxReceipt" {
        //TESTFLIGHT environment
    } else {
        //APPSTORE environment
    }
#endif
一个接一个地运行最多 10 个请求!
API.employee.all()
    .and(API.office.all())
    .and(API.car.all())
    .and(API.event.all())
    .and(API.post.all())
    .onError { error in
        print(error.description)
    }.onSuccess { employees, offices, cars, events, posts in
   // do what you want with received results!!! 🍻
}
onRequestStarted, onNetworkUnavailable, onCancellation, onNotAuthorized, onTimeout also available! //TBD: onProgress
我相信这太棒了! 特别是对于那些不熟悉或不喜欢响应式编程的人 🙂
如果你想一个接一个或同时运行多个请求,但只有一个 completion handler,你可以使用 .flatten()
[API.employee.all(), API.office.all(), API.car.all()].flatten().onError {
    print(error.description)
}.onSuccess {
    print("flatten finished!")
}
要并发运行它们,只需添加 .concurrent(by: 3) 即可同时运行 3 个,要跳过错误,还可以添加 .avoidCancelOnError(),要获取进度,请添加 .onProgress
请随时发送 pull request,并在 issues 中提出你的问题
希望这个库在你的项目中真的很有用! 告诉你的朋友! 请按下 STAR ⭐️ 按钮!!!
Mike Isaev, isaev.mihael@gmail.com