更快地创建描述性的 UIKit 屏幕!
摆脱约束操作,使用声明式语言来创建你的视图,从而减少 UI 代码,使视图更具可读性并加快迭代速度。
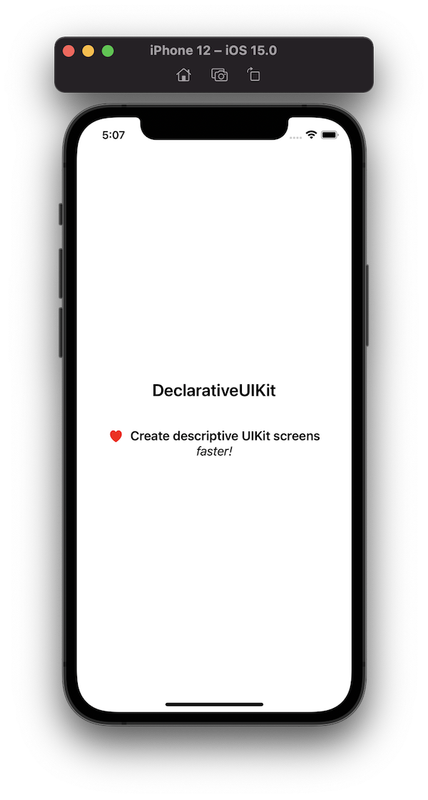
class DeclarativeViewController: UIViewController {
    var body: UIView {
        VerticalStack {
            Spacer()

            UILabel()
                .text("DeclarativeUIKit")
                .font(.boldSystemFont(ofSize: 24))
                .padding(.bottom, 20)

            HorizontalStack {
                UIImageView()
                    .image(UIImage(systemName: "heart.fill")?.withTintColor(.red, renderingMode: .alwaysOriginal))
                    .padding(.trailing, 4)

                UILabel()
                    .text("Create descriptive UIKit screens")
                    .font(.boldSystemFont(ofSize: 18))
            }

            UILabel()
                .text("fast!")
                .font(.italicSystemFont(ofSize: 18))

            Spacer()
        }
        .alignment(.center)
    }

    override func viewDidLoad() {
        super.viewDidLoad()
        view.backgroundColor = .white
        // add is a convenience method that abstracts the work of
        // setting `translatesAutoresizingMaskIntoConstraints` to false
        // and connecting the content view with the superview.
        // In other words, by calling `add` with `content`, it will expand the content to fit the view.
        view.add(body)
    }
}
- XCode 11.4+
- Swift 5.2+
- iOS 10+
- 更具可读性的代码
- 更少的代码行数
- 没有花哨的类,因此你不需要子类化或使用任何其他东西,只需使用纯粹的 UIKit 即可。
- 对众所周知的方法使用相同的命名,因此你可以跟随你的直觉。
让我们重新创建以下视图

使用 UIKit,它可能看起来像这样
class RegularAlarmCardView: UIView {

    private let title: String
    private let subtitle: String

    init(title: String, subtitle: String) {
        self.title = title
        self.subtitle = subtitle
        super.init(frame: .zero)
        setupView()
    }

    required init?(coder: NSCoder) {
        fatalError("init(coder:) has not been implemented")
    }

    func setupView() {
        let imageView = UIImageView(image: UIImage(systemName: "alarm"))
        let titleLabel = UILabel()
        let descriptionLabel = UILabel()

        imageView.contentMode = .scaleAspectFit
        imageView.setContentHuggingPriority(.defaultHigh, for: .horizontal)

        titleLabel.text = title
        titleLabel.font = .boldSystemFont(ofSize: 14)

        descriptionLabel.text = subtitle
        descriptionLabel.font = .systemFont(ofSize: 12)

        addSubview(imageView)
        addSubview(titleLabel)
        addSubview(descriptionLabel)

        imageView.translatesAutoresizingMaskIntoConstraints = false
        titleLabel.translatesAutoresizingMaskIntoConstraints = false
        descriptionLabel.translatesAutoresizingMaskIntoConstraints = false

        NSLayoutConstraint.activate([
            imageView.topAnchor.constraint(equalTo: safeAreaLayoutGuide.topAnchor),
            imageView.leadingAnchor.constraint(equalTo: safeAreaLayoutGuide.leadingAnchor, constant: 20)
        ])

        NSLayoutConstraint.activate([
            titleLabel.topAnchor.constraint(equalTo: imageView.safeAreaLayoutGuide.topAnchor),
            titleLabel.leadingAnchor.constraint(equalTo: imageView.safeAreaLayoutGuide.trailingAnchor, constant: 10),
            titleLabel.trailingAnchor.constraint(equalTo: safeAreaLayoutGuide.trailingAnchor)
        ])

        NSLayoutConstraint.activate([
            descriptionLabel.topAnchor.constraint(equalTo: titleLabel.safeAreaLayoutGuide.bottomAnchor),
            descriptionLabel.leadingAnchor.constraint(equalTo: titleLabel.safeAreaLayoutGuide.leadingAnchor),
            descriptionLabel.trailingAnchor.constraint(equalTo: safeAreaLayoutGuide.trailingAnchor),
            descriptionLabel.bottomAnchor.constraint(equalTo: safeAreaLayoutGuide.bottomAnchor)
        ])
    }
}
通过使用 DeclarativeUIKit,我们可以简化这段代码
class DeclarativeAlarmCardView: UIView {
    lazy var body: UIView = {
        HorizontalStack {
            UIImageView(image: UIImage(systemName: "alarm"))
                .contentMode(.scaleAspectFit)
                .set(contentHuggingPriority: .defaultHigh, for: .horizontal)
                .padding(.leading, 20)

            VerticalStack {
                UILabel()
                    .text(title)
                    .font(.boldSystemFont(ofSize: 14))

                UILabel()
                    .text(subtitle)
                    .font(.systemFont(ofSize: 12))
            }
            .padding(.leading, 10)
        }
        .alignment(.top)
    }()

    private let title: String
    private let subtitle: String

    init(title: String, subtitle: String) {
        self.title = title
        self.subtitle = subtitle
        super.init(frame: .zero)
        add(body)
    }

    required init?(coder: NSCoder) {
        fatalError("init(coder:) has not been implemented")
    }
}
这大约减少了原始视图设置代码 50% 的行数,而且我们不必处理任何约束。 最重要的是,这个框架最大的优势之一是它操作视图的容易程度。 重新定位元素就像交换元素一样容易,而不是手动连接受影响视图的相应约束。 此外,它的声明性质使得仅通过查看代码就可以轻松地可视化视图的组成,非常类似于 SwiftUI。
你的团队可能想要使用此框架的主要原因如下
- 它支持较旧的 iOS 版本 (iOS 10+)。
- 它比使用纯 UIKit 开发更快。
- 它比带有约束的纯 UIKit 更具可读性。
- DeclarativeUIKit 是一个很好的过渡到 SwiftUI 的工具,因为它借鉴了它的一些特性(例如声明式外观和 spacer 的使用),同时与 UIKit 元素完全兼容。
- 它比 SwiftUI 更容易掌握。
DeclarativeUIKit 是 UIKit 的扩展,而不是 SwiftUI 的替代品。 因此,在 UIKit 类中找到的 setter 将具有返回对象本身的对应项,同时尽可能保持相同的命名,这与 SwiftUI 的情况不同。 例如,当将 UIKit 视图的背景颜色设置为绿色时,我们调用 view.backgroundColor = .green。 此框架将为你提供一个具有相同名称的函数,view.backgroundColor(.green),这与 SwiftUI 不同,后者将是 view.background(Color.green)。 尽管我们尝试保持相同的名称,但在某些情况下这是不可能的,例如 addArrangedSubview 和其他一般方法。
DeclarativeUIKit 不会在幕后进行任何魔法,它只是抽象了约束的使用。 因此,自动布局规则在这里是相同的。 尽管如此,我们可能会借鉴 SwiftUI 的一些元素和概念,比如 Spacer,仅仅是因为 UIKit 中没有等效的东西,它让我们的生活更轻松。
import DeclarativeUIKit
class DeclarativeViewController: UIViewController {
    var body: UIView = {
        VerticalStack {
            UILabel()
                .text("Hello world!")
                .font(.boldSystemFont(ofSize: 24))
                .textAlignment(.center)
                .textColor(.white)
        }
    }
}
class DeclarativeViewController: UIViewController {
    var body: UIView = {
        ...
    }()

    override func viewDidLoad() {
        super.viewDidLoad()
        view.add(body)
    }
}
Spacers 将尝试扩展,因此我们可以使用它来移动内容并允许某些区域增长,从而避免布局问题。
例如:将内容推到底部
class DeclarativeViewController: UIViewController {
    var content: UIView = {
        VerticalStack {
            Spacer()
            // Some Element here
        }
    }()
    ...
}
在 使用 Spacers 来移动内容 中查看更多内容。
与 SwiftUI 中一样,Spacers 会扩展并移动你的内容。
将内容推到右侧
HorizontalStack {
    Spacer()
    // Some Element here
}
将内容向上推
VerticallStack {
    // Some Element here
    Spacer()
}
居中内容
HorizontalStack{ //or VerticalStack()
    Spacer()
    // Some Element here
    Spacer()
}
就像使用 Autolayout 时一样,如果未正确配置,你的视图可能会出现布局问题。 例如,如果你有一个连接到屏幕所有角的堆栈,然后你在其中插入两个标签,xcode 会抱怨高度歧义。
这是因为 xcode 必须扩展其中一个视图以适应屏幕,并且你还没有定义应该“破坏”哪个视图才能实现这一点。
使用 DeclarativeUIKit,有一些解决此问题的方法
- 设置内容拥抱优先级,就像你使用常规堆栈一样
class DeclarativeViewController: UIViewController {
    lazy var body: UIView = {
        VerticalStack {
            UILabel()
                .text("Title")
                .set(huggingPriority: .defaultHigh, for: .vertical)

            UILabel()
                .text("Subtitle")
        }
    }()

    override func viewDidLoad() {
        super.viewDidLoad()
        view.add(body).backgroundColor(.white)
    }
}
- 使用 Spacer,以便它可以相应地扩展。
class DeclarativeViewController: UIViewController {
    lazy var body: UIView = {
        VerticalStack {
            UILabel()
                .text("Title")

            UILabel()
                .text("Subtitle")

            Spacer()
        }
    }()

    override func viewDidLoad() {
        super.viewDidLoad()
        view.add(body).backgroundColor(.white)
    }
}
- 允许堆栈根据需要扩展,就像你通常所做的那样
class DeclarativeViewController: UIViewController {
    lazy var content: UIView = {
        VerticalStack{
            ...
        }
    }()

    override func viewDidLoad() {
        super.viewDidLoad()

        content.translatesAutoresizingMaskIntoConstraints = false
        view.backgroundColor(.white).addSubview(content)

        NSLayoutConstraint.activate([
            content.topAnchor.constraint(equalTo: view.safeAreaLayoutGuide.topAnchor),
            content.leadingAnchor.constraint(equalTo: view.safeAreaLayoutGuide.leadingAnchor),
            content.trailingAnchor.constraint(equalTo: view.safeAreaLayoutGuide.trailingAnchor),
            content.bottomAnchor.constraint(lessThanOrEqualTo: view.safeAreaLayoutGuide.bottomAnchor)
        ])
    }
}
class DeclarativeViewController: UIViewController {
    lazy var content: UIView = {
        VerticalStack()
            .addArranged(
                titleLabel
            )
            .addArranged(
                subtitleLabel
            )
    }()

    var titleLabel = UILabel().text("Title")
    var subtitleLabel = UILabel().text("Subtitle")

    ...
}
class DeclarativeViewController: UIViewController {
    lazy var content: UIView = {
        ...
    }()

    override func viewDidLoad() {
        super.viewDidLoad()
        view.addSubview(content)

        content
            .backgroundColor(.white)
            .connect(\.topAnchor, to: view.safeAreaLayoutGuide.topAnchor)
            .connect(\.leadingAnchor, to: view.safeAreaLayoutGuide.leadingAnchor)
            .connect(\.trailingAnchor, to: view.safeAreaLayoutGuide.trailingAnchor)
            .connect(\.bottomAnchor, to: view.safeAreaLayoutGuide.bottomAnchor)
    }
}
import UIKit
import DeclarativeUIKit

class DeclarativeViewController: UIViewController {
    lazy var content: UIView = {
        VerticalStack()
            .addArranged(
                UILabel().text("Title")
                    .set(\.heightAnchor, to: 50)
                    .set(\.widthAnchor, to: 100)
            )
            .addArranged(
                UILabel().text("Subtitle")
                    .set(\.heightAnchor, to: 50)
            )
            .spacer()
    }()

    override func viewDidLoad() {
        super.viewDidLoad()
        view.add(content).backgroundColor(.white)
    }
}
即使你的应用程序不支持 SwiftUI 或 iOS 13,你仍然可以利用预览 Canvas。 此功能未包含在此框架中,因为你可能必须向你的项目添加一些额外的标志。 但是,如果你仍然想使用它,这是你可以执行的操作
- 添加一个
UIViewControllerRepresentable作为容器
@available(iOS 13.0, *)
struct ViewControllerContainer: UIViewControllerRepresentable {
    let viewController: () -> UIViewController

    init(_ viewController: @escaping () -> UIViewController) {
        self.viewController = viewController
    }

    func makeUIViewController(context: Context) -> some UIViewController {
        viewController()
    }

    func updateUIViewController(_ uiViewController: UIViewControllerType, context: Context) {}
}
- 在你的 View Controller 文件的底部添加一个预览
#if DEBUG
import SwiftUI

@available(iOS 13.0, *)
struct MyViewController_Previews: PreviewProvider {
    static var previews: some View {
        ViewControllerPreview {
            MyViewController()
        }
    }
}
#endif