一个更简单、更优雅的 UITableView,更像是 SwiftUI 的风格,而不是 UIKit。行由对象管理,操作通过 Block 实现。
你的整个表格会被预先声明,不需要任何委托。
TableView 使用响应链方式来提供设置。任何设置都可以在行级别、节级别或表格级别进行设置。
这允许在表格级别进行简单配置,并在行级别进行轻松自定义。
Block 用于 tap 事件处理、delete 事件处理、样式设置等。
支持默认的(彩色)辅助视图。
HSTableView 适用于行数已知且有限的情况(尽管数量可能会改变)。它不支持无限滚动表格(对于这种情况,您必须使用 UITableView 和委托!)。
使用 CocoaPods
pod 'HSTableView'
或使用 Swift Package Manager
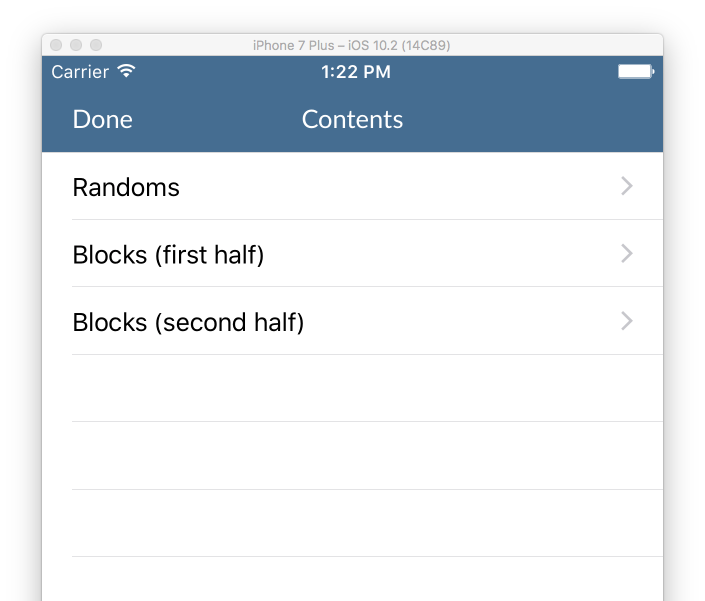
一个简单的表格,包含三行,并且每行都有点击事件处理。
    func populateTable()
    {
        table.startDataUpdate()

        self.table.addSection()
        //All the rows have the same accessory type, so define it at the table level
        table.info.accessoryType = .disclosureIndicator

        table += HSTVRowInfo(title:"Randoms") {
            (rowInfo) in
            print("Clicked on row 1")
        }

        table += HSTVRowInfo(title:"Blocks (first half)") {
            (rowInfo) in
            print("Clicked on row 2")
        }

        table += HSTVRowInfo(title:"Blocks (second half)") {
            (rowInfo) in
            print("Clicked on row 3")
        }

        self.table.applyDataUpdate()
    }
每个单元格都通过响应链处理
HSTVRowInfo -> HSTVSectionInfo -> HSTVTableInfo
因此,例如,要获取行的标题颜色,表格首先检查 HSTVRowInfo 上是否设置了 titleColor。 如果该值为空,则检查 HSTVSectionInfo,如果该值也为空,则检查 HSTVTableInfo。
这意味着对于适用于整个表格或节的内容,您可以在顶层设置一次 - 并且仍然可以在每行级别覆盖特定值。
您可以使用标准的 setter(title、subtitle、style 等)自定义显示。
    var row = HSTVRowInfo(title:"MyTitle", subtitle:"My Subtitle")
    row.titleColor = .red
    row.leftImageName = "MyImageName"

    table += row
或者使用 afterCreate 或 beforeDisplay 处理程序。
   var row = HSTVRowInfo(title:"MyTitle", subtitle:"My Subtitle")
   row.styleAfterCreateHandler = {
       row,cell in

       cell.myCustomLabel.text = "TextForCustomLabel"
   }

   table += row
注意 - 如果您对多个单元格执行相同的自定义操作 - 您可以使用表格或节级别的处理程序,并从 customInfo 属性访问您需要的信息。
   table.info.styleAfterCreateHandler = {
       row,cell in

       cell.myCustomLabel.text = row.customInfo!.customLabelText
   }
-
您可以通过设置 HSTVRowInfo.style 来使用标准的单元格格式。
-
您可以使用 HSTVRowInfo.nib 指定自定义 nib。
-
您可以通过子类化 HSTVRowInfo 并重写来创建自定义单元格。
func makeNewCell(_ identifier: String, inheritedStyle: UITableViewCellStyle) -> UITableViewCell
我经常在我的应用程序中使用表格来设置 true/false 设置。 有一个自定义处理程序可以显示/隐藏复选标记,并在用户点击行时更新布尔 UserDefault。
	row.handleCheckmark(userDefault:"TestDefault",
                            checkedSubtitle: "Checked (user default true)",
                            uncheckedSubtitle: "UnChecked (user default false)")
您可以使用 filter 选项来动画显示和消失表格中的单元格。 当行被隐藏时,它的高度设置为 0,以便可以动画地消失。 在设计单元格时,您应该考虑这一点 - 如果单元格具有固定高度的视图,则动画会更快,这样在单元格向下动画时就不需要多次重新绘制。
例如 - 要根据搜索栏中的文本按标题过滤表格。
   func searchBar(_ searchBar: UISearchBar, textDidChange searchText: String) {

       tableView.filter { (row) -> Bool in
           return row.title?.contains(string: searchText) ?? false
       }
   }
此函数完全定义了示例表格。
    func populateTable()
    {
        table.startDataUpdate()
        table.allowsSelectionDuringEditing=true

        // Provide defaults for all rows in the table
        // This will apply unless a value is set at a more specific level (section or row)
        table.info.subtitleColor = UIColor.lightGray
        table.info.subtitle="Table default subtitle"
        table.info.clickHandler = {row in
            //Default click handler prints the index path, updates the subtitle and redraws the row
            print("Table handler click: \(row.lastIndexPath)")
            row.subtitle="clicked at \(Date.init())"
            row.redrawCell(UITableViewRowAnimation.fade)
        };

        // Section
        // Add a section with a simple title
        //
        var section=self.table.addSection("Regular cells")
        // Provide some defaults for items in this section
        section.info.titleColor=UIColor.blue
        section.info.subtitleColor=UIColor.orange

        //First row has a simple click handler that reloads the table data
        //The number or rows is random - so you can see the effect of the reload
        var row=HSTVRowInfo(title:"Reload Table",subtitle: "Number of rows in first section is somewhat random")
        row.leftImageName="713-refresh-1"
        row.clickHandler = {
            [unowned self] (row) in
            self.populateTable()
        };
        table += row

        let numberOfRandoms=arc4random_uniform(6)
        //Random number of rows with the title 'Section One'
        //Odd rows get their subtitle from the table
        //Even rows have their own subtitle
        for i in 1...(2+numberOfRandoms) {
            row=HSTVRowInfo(title:"Section One: \(i)")
            if (i%2==0)
            {
                row.subtitle="subtitle \(Date.init())"
                row.clickHandler = {row in
                    print("Regular cell section click handler, \(i)")
                };
            }
            table += row
        }

        // Section
        // Simple swipe to delete row
        //
        self.table.addSection("Editable")
        row = HSTVRowInfo(title: "Swipe to delete")
        row.editingStyle=UITableViewCellEditingStyle.delete
        row.deleteHandler=row.simpleDeleteHandler
        table += row

        // Section
        // Row value is linked to the user default 'TestDefault'
        //
        self.table.addSection("Linked to default")
        row = HSTVRowInfo(title: "Linked to UserDefault 'TestDefault'")
        row.handleCheckmark(userDefault:"TestDefault",
                            checkedSubtitle: "Checked (user default true)",
                            uncheckedSubtitle: "UnChecked (user default false)")
        table += row

        //Row value is linked to the user default 'TestDefault', but checkmark shows when value is false
        row = HSTVRowInfo(title: "Linked to UserDefault 'TestOppositeDefault'")
        row.handleCheckmark(userDefault:"TestOppositeDefault",
                            checkedSubtitle: "Checked (user default false)",
                            uncheckedSubtitle: "UnChecked (user default true)",
                            checkmarkShowsForFalse: true)
        table += row

        // Section
        // Various accessory views
        // (including coloured disclosure indicators)
        section=self.table.addSection("Accessory views")
        section.info.subtitle=""

        row = HSTVRowInfo(title:"Chevron")
        row.accessoryType = .disclosureIndicator
        row.leftImageName="04-squiggle"
        row.tintColor=UIColor.orange
        row.tintChevronDisclosures = true
        table += row


        row = HSTVRowInfo(title:"Chevron")
        row.accessoryType = .disclosureIndicator
        row.tintColor=UIColor.orange
        table += row


        row = HSTVRowInfo(title:"Disclosure")
        row.accessoryType = .detailDisclosureButton
        row.leftImageName="04-squiggle"
        row.leftImageColor=UIColor.purple
        row.tintColor=UIColor.orange
        row.tintChevronDisclosures = true
        row.accessoryClickHandler = {
            row in
            print ("Disclosure accessory clicked")
        }
        table += row

        row = HSTVRowInfo(title:"Checkmark")
        row.accessoryType = .checkmark
        table += row

        row = HSTVRowInfo(title:"Info")
        row.accessoryType = .detailButton
        row.accessoryClickHandler = {
            row in
            print ("Info accessory clicked")
        }
        table += row

//         Section
//         Row loaded from prototype cell
        section = self.table.addSection("Cell Prototype")
        section.info.reuseIdentifier = "ProtoCell"


        for i in 1...2 {
            let row=HSTVRowInfo(title:"One: \(i)")
            if (i%2==0)
            {
                row.subtitle="subtitle"
            }
            table += row
        }


        // Section
        // Row loaded from custom xib
        //
        section = self.table.addSection("Custom Xib")
        section.info.subtitle="Section Override"
        let myNib = UINib(nibName: "MyTableViewCell", bundle: nil)
        section.info.nib=myNib
        section.info.estimatedRowHeight=150

        for i in 1...2 {
            let row=HSTVRowInfo(title:"One: \(i)")
            if (i%2==0)
            {
                row.subtitle="subtitle"
            }
            table += row
        }

        // Section
        // Nil title for section makes the header invisibile
        // styleAfterCreate handler used to set custom background and override label colours
        //
        section=self.table.addSection(nil)
        for i in 1...2 {
            let row=HSTVRowInfo(title:"Section with no header \(i)")
            table += row
        }

        //style after create handler in this section customises the row in code
        //setting a reuseTag makes sure that this cell is not re-used elsewhere
        section.info.styleAfterCreateHandler = {
            row,cell in

            //os caches imageNamed results
            var image=UIImage(named:"tableRowBackground.png")
            image=image?.stretchableImage(withLeftCapWidth: 30, topCapHeight: 2)

            cell.backgroundView=UIImageView.init(image: image)

            cell.textLabel?.textColor=UIColor.white
            cell.detailTextLabel?.textColor=UIColor.white
        }
        section.info.reuseTag="orange"

        self.table.applyDataUpdate()
    }