OpenAI 是一个社区维护的仓库,包含对 OpenAI 公共 API 的 Swift 实现。
OpenAI API 可以应用于几乎任何涉及理解或生成自然语言或代码的任务。我们提供一系列具有不同能力级别的模型,适用于不同的任务,以及微调您自己的自定义模型的能力。这些模型可以用于从内容生成到语义搜索和分类的各种用途。
OpenAI 可通过 CocoaPods 和 Swift Package Manager 获取。
CocoaPods 是 Cocoa 项目的依赖项管理器。有关使用和安装说明,请访问他们的网站。要使用 CocoaPods 将 OpenAI 集成到您的 Xcode 项目中,请在您的 Podfile 中指定它
pod 'OpenAIKit'
Swift Package Manager 是一个用于自动化 Swift 代码分发的工具,并已集成到 swift 编译器中。
一旦您设置好 Swift 包,添加 OpenAI 作为依赖项就像将其添加到您的 Package.swift 的 dependencies 值中一样简单。
dependencies: [
    .package(url: "https://github.com/FuturraGroup/OpenAI.git", .branch("main"))
]
建议使用环境变量来注入 OpenAI API 密钥,而不是将其硬编码在源代码中。这在我们的 示例项目 中展示。
let apiToken: String = "<Your OpenAI API Token here>"
let organizationName: String = "<Your OpenAI Organization name>"
在您的项目中方便的任何位置使用您的 API 令牌初始化 OpenAIKit。组织名称是可选的。
import OpenAIKit

public let openAI = OpenAIKit(apiToken: apiToken, organization: organizationName)
额外的可选初始化参数列表
timeoutInterval: TimeInterval- OpenAI API 响应的超时时间间隔。默认值为60秒。customOpenAIURL: String?- 自定义端点以自定义 OpenAI API 端点。默认值为nil。注意! 如果您使用您自己的 URL 自定义customOpenAIURL而不是默认的 OpenAI URL(例如customOpenAIURL: "https://openai.mysite.test")- 路由和方法 不会更改!所有路由都保留其来自 OpenAI 公共 API 的实现。sslCerificatePath: String?-*.cerSSL 证书文件的路径,用于使用 OpenAI 的证书或您自己的服务器证书(如果您使用自定义customOpenAIURL)对其进行验证。默认值为nil。
正如 额外的初始化参数 部分所述,我们接受一个额外的参数 sslCerificatePath 以与 OpenAI 或您自己的服务器建立 SSL 握手。
首先 - 我们制作此功能是为了防止 MITM 攻击。我们验证来自提供的路径 sslCerificatePath 的证书是否与来自 OpenAI 或您服务器的 SSL 证书匹配。如果证书不匹配,我们将取消此请求。
- 保护您的数据免受 MITM 攻击。如果有人在启动您的应用程序的网络中执行 MITM 攻击 - 您的 OpenAI API 密钥 是安全的。他们无法访问请求中的任何私有数据,并且他们会收到关于
SSL 握手失败的错误。 - 不要为黑客浪费您的令牌。在取消带有
SSL 握手失败的请求后,请求不会执行,也不会向 OpenAI 发送任何数据,您也不会在他们身上浪费您的请求令牌! - 您可以将此功能与您的服务器一起使用,只需提供您的 SSL 证书而不是 OpenAI 的证书即可。
注意!我们不保存任何证书,也不管理它们!我们仅使用来自提供的 *.cer 文件的数据来与服务器证书进行比较。我们不对所提供证书的相关性和完整性负责。
这些操作在我们库的能力范围内,您自己必须监控证书的有效性,负责下载新版本等。
下面描述的过程是关于如何正确获取开放的 OpenAI SSL 证书的说明。我们不对您收到证书后对该证书的任何更改及其失去相关性负责。
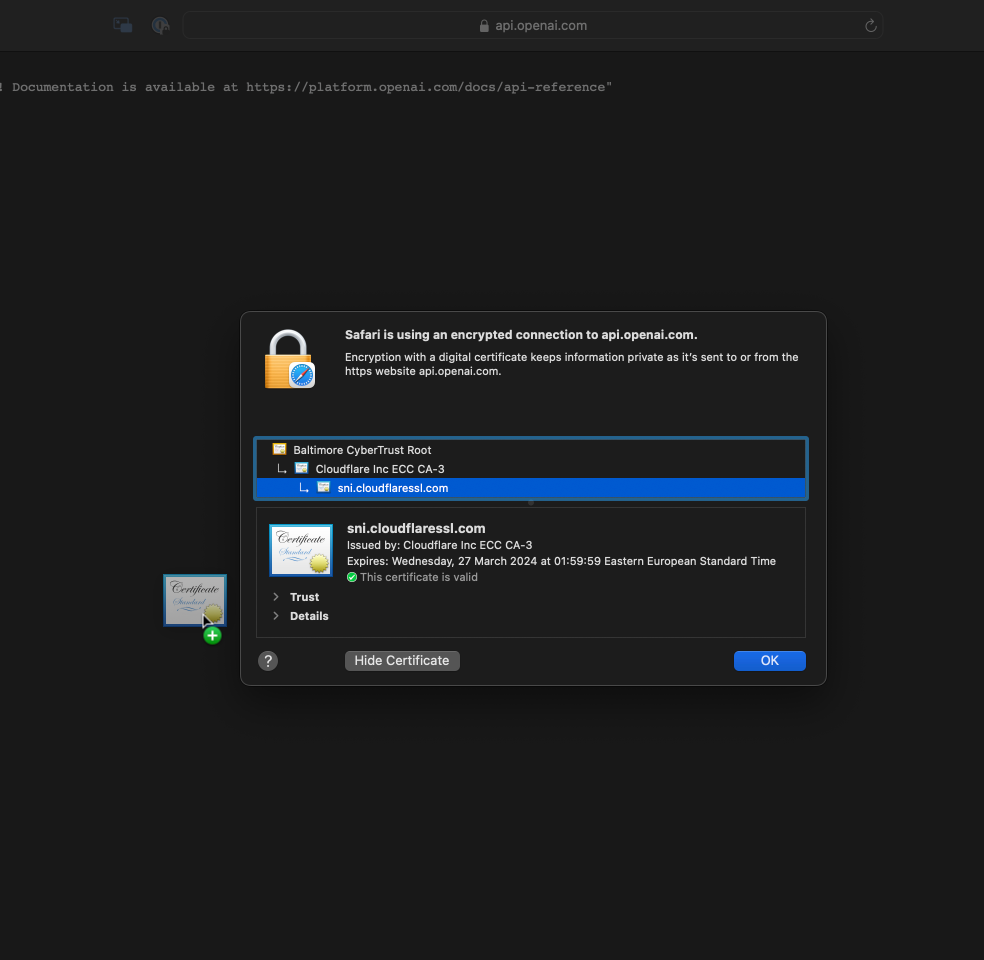
如何使用 SSL 握手
- 从 OpenAI 获取 SSL 证书
- 从 Safari 打开
https://api.openai.com/。必须从 Safari 打开并保存,因为它以二进制格式保存证书。 - 点击地址栏中的锁图标
- 在显示的弹出窗口中点击
显示证书 - 在列表中选择底部的证书,并将证书图标拖放到您需要保存的任何位置。
- 从 Safari 打开
使用 Bundle 源路径的示例
var openAI: OpenAIKit?

if let filePath = Bundle.main.path(forResource: "MyCert", ofType: "cer") {
	openAI = OpenAIKit(apiToken: apiToken, organization: nil, sslCerificatePath: filePath)
}
使用 FileManager 源路径的示例
var openAI: OpenAIKit?

let fileManager = FileManager.default
let documentDirectoryPath = NSSearchPathForDirectoriesInDomains(.documentDirectory, .userDomainMask, true).first as? NSString

if let filePath = documentDirectoryPath?.appendingPathComponent("MyCert.cer") {
	openAI = OpenAIKit(apiToken: apiToken, organization: nil, sslCerificatePath: filePath)
}
创建一个调用补全 API 的请求,传入文本提示。
openAI.sendCompletion(prompt: "Hello!", model: .gptV3_5(.davinciText003), maxTokens: 2048) { [weak self] result in
    switch result {
    case .success(let aiResult):
        DispatchQueue.main.async {
            if let text = aiResult.choices.first?.text {
                print("response text: \(text)") //"\n\nHello there, how may I assist you today?"
            }
        }
    case .failure(let error):
        DispatchQueue.main.async { [weak self] in
            let alert = UIAlertController(title: "Error", message: error.localizedDescription, preferredStyle: .alert)
            alert.addAction(UIAlertAction(title: "Ok", style: .default))
            self?.present(alert, animated: true)
        }
    }
}
所有方法也支持 async/await 用法。这是一个示例。
let result = await openAI.sendCompletion(prompt: "Hello!", model: .gptV3_5(.davinciText003), maxTokens: 2048)

switch result {
case .success(let aiResult):
 /// Hadle success response result
    if let text = aiResult.choices.first?.text {
  print("response text: \(text)") //"\n\nHello there, how may I assist you today?"
    }
case .failure(let error):
 /// Hadle error actions
    print(error.localizedDescription)
}
聊天补全几乎与补全相同,只有一些差异
- 它可以理解带有路径的前一条聊天消息的上下文(阅读更多)。
- 响应文本位于检索到的补全的消息字段中
- 仅支持 gpt-3.5-turbo 和 gpt-3.5-turbo-0301 模型(阅读更多关于模型兼容性的信息)。
openAI.sendChatCompletion(newMessage: AIMessage(role: .user, content: prompt), previousMessages: [], model: .gptV3_5(.gptTurbo), maxTokens: 2048, n: 1, completion: { [weak self] result in
	DispatchQueue.main.async { self?.stopLoading() }

	switch result {
	case .success(let aiResult):
		// Handle result actions
		if let text = aiResult.choices.first?.message?.content {
			print(text)
		}
	case .failure(let error):
		// Handle error actions
		print(error.localizedDescription)
	}
})
您可以以流式部分进度检索来自 OpenAI 的补全和聊天补全的响应。无需等待整个补全响应完成的时间。您可以实时处理和呈现结果。
聊天补全的示例调用
openAI.sendStreamChatCompletion(newMessage: AIMessage(role: .user, content: "Hello!"), model: .gptV3_5(.gptTurbo), maxTokens: 2048) { result in
	switch result {
	case .success(let streamResult):
		/// Hadle success response result
		if let streamMessage = streamResult.message?.choices.first?.message {
			print("Stream message: \(streamMessage)") //"\n\nHello there, how may I assist you today?"
		}
	case .failure(let error):
		// Handle error actions
		print(error.localizedDescription)
	}
}
您也可以像这样手动停止流式传输
openAI.sendStreamChatCompletion(newMessage: AIMessage(role: .user, content: "Hello!"), model: .gptV3_5(.gptTurbo), maxTokens: 2048) { result in
	switch result {
	case .success(let streamResult):
		/// Hadle success response result

		streamResult.stream.stopStream() /// Manually stop stream
	case .failure(let error):
		// Handle error actions
		print(error.localizedDescription)
	}
}
使用聊天补全的一种常见方法是指示模型始终返回对您的用例有意义的 JSON 对象,方法是在系统消息中指定这一点。为了防止这些错误并提高模型性能,当调用 gpt-4-turbo-preview 或 gpt-3.5-turbo-1106 时,您可以将 response_format 设置为 { "type": "json_object" } 以启用 JSON 模式。启用 JSON 模式后,模型将被约束为仅生成解析为有效 JSON 对象的字符串。更多详细信息请参见 OpenAI JSON 模式 文档。
您可以在 sendChatCompletion 或 sendStreamChatCompletion 方法中使用它。将可选参数 responseFormat 传递给其中任何一种方法
openAI.sendChatCompletion(newMessage: AIMessage(role: .user, content: prompt), previousMessages: [], model: .gptV3_5(.gptTurbo), maxTokens: 2048, n: 1, responseFormat: .json, completion: { [weak self] result in
	DispatchQueue.main.async { self?.stopLoading() }

	switch result {
	case .success(let aiResult):
		// Handle result actions
		if let text = aiResult.choices.first?.message?.content {
			print(text) /// Printed JSON string
		}
	case .failure(let error):
		// Handle error actions
		print(error.localizedDescription)
	}
})
DALL·E 是一个 AI 系统,可以根据自然语言的描述创建逼真的图像和艺术作品。我们目前支持以下能力:给定一个提示,创建一个具有特定尺寸的新图像,编辑现有图像,或创建用户提供的图像的变体。
下面的代码演示了如何使用 DALL·E 生成图像
openAI.sendImagesRequest(prompt: "bird", size: .size512, n: 1) { [weak self] result in

    switch result {
    case .success(let aiResult):

        DispatchQueue.main.async {
            if let urlString = aiResult.data.first?.url {
                print("generated image url: \(urlString)")
            }
        }
    case .failure(let error):
        DispatchQueue.main.async { [weak self] in
            let alert = UIAlertController(title: "Error", message: error.localizedDescription, preferredStyle: .alert)
            alert.addAction(UIAlertAction(title: "Ok", style: .default))
            self?.present(alert, animated: true)
        }
    }
}
欢迎为改进做出贡献。请随时提交拉取请求以帮助扩展库。如果您有任何问题、功能建议或错误报告,请将它们发送到 Issues。
MIT License

Copyright (c) 2023 Futurra Group

Permission is hereby granted, free of charge, to any person obtaining a copy
of this software and associated documentation files (the "Software"), to deal
in the Software without restriction, including without limitation the rights
to use, copy, modify, merge, publish, distribute, sublicense, and/or sell
copies of the Software, and to permit persons to whom the Software is
furnished to do so, subject to the following conditions:

The above copyright notice and this permission notice shall be included in all
copies or substantial portions of the Software.

THE SOFTWARE IS PROVIDED "AS IS", WITHOUT WARRANTY OF ANY KIND, EXPRESS OR
IMPLIED, INCLUDING BUT NOT LIMITED TO THE WARRANTIES OF MERCHANTABILITY,
FITNESS FOR A PARTICULAR PURPOSE AND NONINFRINGEMENT. IN NO EVENT SHALL THE
AUTHORS OR COPYRIGHT HOLDERS BE LIABLE FOR ANY CLAIM, DAMAGES OR OTHER
LIABILITY, WHETHER IN AN ACTION OF CONTRACT, TORT OR OTHERWISE, ARISING FROM,
OUT OF OR IN CONNECTION WITH THE SOFTWARE OR THE USE OR OTHER DEALINGS IN THE
SOFTWARE.


