 |
|
|---|---|
| GitHub Actions | |
| 框架 |    |
| 平台 |  |
| 许可证 |  |
RxFlow 是一个基于 响应式流程协调器模式 (Reactive Flow Coordinator pattern) 的 iOS 应用程序导航框架。
本 README 简述了引导我开发此框架的整个概念过程。
你可以在我的博客上找到关于整个项目的非常详细的解释
- RxFlow Part 1: In Theory (RxFlow 第 1 部分:理论)
- RxFlow Part 2: In Practice (RxFlow 第 2 部分:实践)
- RxFlow Part 3: Tips and Tricks (RxFlow 第 3 部分:技巧)
Jazzy 文档也可以在此处查看:文档
这里还有一个 响应式协调器技术讲座,它解释了该框架的目标和动机。 仅提供俄语版本。 要获得英文字幕,您应该按字幕按钮以查看原始(俄语)字幕,然后选择“设置”->“字幕”->“翻译”->选择您的语言
关于 iOS 应用程序中的导航,有两种选择
- 使用 Apple 和 Xcode 提供的内置机制:storyboards 和 segues
- 直接在代码中实现自定义机制
这两种解决方案的缺点
- 内置机制:导航相对静态,storyboards 庞大。 导航代码污染了 UIViewControllers
- 自定义机制:代码可能难以设置,并且根据所选的设计模式(Router、Coordinator)可能很复杂
- 促进将 storyboards 切割成原子单元,以实现 UIViewControllers 的协作和可重用性
- 允许根据导航上下文以不同的方式呈现 UIViewController
- 简化依赖注入的实现
- 从 UIViewControllers 中删除所有导航机制
- 推广响应式编程
- 以声明方式表达导航,同时解决大多数导航情况
- 方便将应用程序切割成逻辑导航块
在你的 Cartfile 中
github "RxSwiftCommunity/RxFlow"
在你的 Podfile 中
pod 'RxFlow'
在你的 Package.swift 中
let package = Package(
  name: "Example",
  dependencies: [
    .package(url: "https://github.com/RxSwiftCommunity/RxFlow.git", from: "2.10.0")
  ],
  targets: [
    .target(name: "Example", dependencies: ["RxFlow"])
  ]
)
Coordinator 模式是组织应用程序中导航的绝佳方法。 它允许
- 从 UIViewControllers 中删除导航代码。
- 在不同的导航上下文中重用 UIViewControllers。
- 简化依赖注入的使用。
要了解更多信息,我建议你查看这篇文章:(Coordinator Redux)。
然而,Coordinator 模式也可能存在一些缺点
- 每次引导应用程序时,都必须编写协调机制。
- 与 Coordinators 堆栈通信可能会导致大量的样板代码。
RxFlow 是 Coordinator 模式的响应式实现。 它具有此架构的所有强大功能,但带来了一些改进
- 它使 Flows 中的导航更加声明性。
- 它提供了一个内置的 FlowCoordinator,用于处理 Flows 之间的导航。
- 它使用响应式编程来触发 FlowCoordinators 的导航操作。
要理解 RxFlow,您需要熟悉 6 个术语
- Flow:每个 Flow 定义应用程序中的一个导航区域。 这是您声明导航操作(例如呈现 UIViewController 或另一个 Flow)的地方。
- Step:Step 是一种表达可能导致导航的状态的方式。 Flows 和 Steps 的组合描述了所有可能的导航操作。 Step 甚至可以嵌入内部值(例如 Ids、URLs 等),这些值将传播到 Flows 中声明的屏幕。
- Stepper:Stepper 可以是任何可以在 Flows 中发出 Steps 的东西。
- Presentable:它是可以呈现的事物的抽象(基本上 UIViewController 和 Flow 都是 Presentable)。
- FlowContributor:它是一个简单的数据结构,告诉 FlowCoordinator 在 Flow 中哪些东西可以发出新的 Steps。
- FlowCoordinator:一旦开发人员定义了代表导航可能性的 Flows 和 Steps 的合适组合,FlowCoordinator 的工作就是混合这些组合来处理应用程序的所有导航。 FlowCoordinators 由 RxFlow 提供,您不必实现它们。
Steps 是最终表达导航意图的小状态片段,在枚举中声明它们非常方便
enum DemoStep: Step {
    // Login
    case loginIsRequired
    case userIsLoggedIn

    // Onboarding
    case onboardingIsRequired
    case onboardingIsComplete

    // Home
    case dashboardIsRequired

    // Movies
    case moviesAreRequired
    case movieIsPicked (withId: Int)
    case castIsPicked (withId: Int)

    // Settings
    case settingsAreRequired
    case settingsAreComplete
}
我们的想法是尽可能保持 Steps navigation independent。 例如,调用 Step showMovieDetail(withId: Int) 可能不是一个好主意,因为它将选择电影的事实与显示电影详细信息屏幕的后果紧密结合在一起。 决定导航到哪里不是 Step 的发射器决定的,这个决定属于 Flow。
以下 Flow 用作导航堆栈。 你所要做的就是
- 声明一个根 Presentable,你的导航将基于它。
- 实现 navigate(to:) 函数以将 Step 转换为导航操作。
Flows 可用于在实例化 ViewControllers 时实现依赖注入。
navigate(to:) 函数返回一个 FlowContributors。 这就是生成下一个导航操作的方式。
例如,值:.one(flowContributor: .contribute(withNextPresentable: viewController, withNextStepper: viewController.viewModel) 表示
viewController是一个 Presentable,它的生命周期将影响关联的 Stepper 发出 Steps 的方式。 例如,如果 Stepper 在其关联的 Presentable 暂时隐藏时发出 Step,则不会处理此 Step。viewController.viewModel是一个 Stepper,它将通过根据其关联的 Presentable 生命周期发出 Steps 来促成该 Flow 中的导航。
class WatchedFlow: Flow {
    var root: Presentable {
        return self.rootViewController
    }

    private let rootViewController = UINavigationController()
    private let services: AppServices

    init(withServices services: AppServices) {
        self.services = services
    }

    func navigate(to step: Step) -> FlowContributors {

        guard let step = step as? DemoStep else { return .none }

        switch step {

        case .moviesAreRequired:
            return navigateToMovieListScreen()
        case .movieIsPicked(let movieId):
            return navigateToMovieDetailScreen(with: movieId)
        case .castIsPicked(let castId):
            return navigateToCastDetailScreen(with: castId)
        default:
            return .none
        }
    }

    private func navigateToMovieListScreen() -> FlowContributors {
        let viewController = WatchedViewController.instantiate(withViewModel: WatchedViewModel(),
                                                               andServices: self.services)
        viewController.title = "Watched"

        self.rootViewController.pushViewController(viewController, animated: true)
        return .one(flowContributor: .contribute(withNextPresentable: viewController, withNextStepper: viewController.viewModel))
    }

    private func navigateToMovieDetailScreen (with movieId: Int) -> FlowContributors {
        let viewController = MovieDetailViewController.instantiate(withViewModel: MovieDetailViewModel(withMovieId: movieId),
                                                                   andServices: self.services)
        viewController.title = viewController.viewModel.title
        self.rootViewController.pushViewController(viewController, animated: true)
        return .one(flowContributor: .contribute(withNextPresentable: viewController, withNextStepper: viewController.viewModel))
    }

    private func navigateToCastDetailScreen (with castId: Int) -> FlowContributors {
        let viewController = CastDetailViewController.instantiate(withViewModel: CastDetailViewModel(withCastId: castId),
                                                                  andServices: self.services)
        viewController.title = viewController.viewModel.name
        self.rootViewController.pushViewController(viewController, animated: true)
        return .none
    }
}
从 AppDelegate 中,您可以访问 FlowCoordinator 并在收到通知时调用 navigate(to:) 函数。
传递给该函数的 step 随后将被传递给所有现有的 Flows,因此您可以调整导航。
func userNotificationCenter(_ center: UNUserNotificationCenter,
                            didReceive response: UNNotificationResponse,
                            withCompletionHandler completionHandler: @escaping () -> Void) {
    // example of how DeepLink can be handled
    self.coordinator.navigate(to: DemoStep.movieIsPicked(withId: 23452))
}
Flow 有一个 adapt(step:) -> Single<Step> 函数,默认情况下返回作为参数给定的 step。
FlowCoordinator 在 navigate(to:) 函数之前调用此函数。 这是实现一些逻辑的绝佳位置,例如,该逻辑可以禁止 step 触发导航。 一个常见的用例是处理应用程序中的导航权限。
假设我们有一个 PermissionManager
func adapt(step: Step) -> Single<Step> {
    switch step {
    case DemoStep.aboutIsRequired:
        return PermissionManager.isAuthorized() ? .just(step) : .just(DemoStep.unauthorized)
    default:
        return .just(step)
    }
}

...

later in the navigate(to:) function, the .unauthorized step could trigger an AlertViewController
为什么要返回 Single 而不是直接返回 Step? 因为一些过滤过程可能是异步的,需要用户操作才能执行(例如,基于具有 TouchID 或 FaceID 的设备的身份验证层进行过滤)
为了提高关注点分离,可以将委托注入到 Flow 中,其目的是处理 adapt(step:) 函数中的改编。 委托最终可以在多个流中重用,以确保改编的一致性。
理论上,Stepper 作为一个协议,可以是任何东西(例如 UIViewController),但一个好的做法是将该行为隔离在 ViewModel 或类似的东西中。
RxFlow 附带一个预定义的 OneStepper 类。 例如,可以在创建新 Flow 时使用它来表达将驱动导航的第一个 Step。
以下 Stepper 将在每次调用函数 pick(movieId:) 时发出 DemoStep.moviePicked(withMovieId:)。 然后 WatchedFlow 将调用函数 navigateToMovieDetailScreen (with movieId: Int)。
class WatchedViewModel: Stepper {

    let movies: [MovieViewModel]
    let steps = PublishRelay<Step>()

    init(with service: MoviesService) {
        // we can do some data refactoring in order to display things exactly the way we want (this is the aim of a ViewModel)
        self.movies = service.watchedMovies().map({ (movie) -> MovieViewModel in
            return MovieViewModel(id: movie.id, title: movie.title, image: movie.image)
        })
    }

    // when a movie is picked, a new Step is emitted.
    // That will trigger a navigation action within the WatchedFlow
    public func pick (movieId: Int) {
        self.steps.accept(DemoStep.movieIsPicked(withId: movieId))
    }

}
当然,这是 Coordinator 的目标。 在 Flow 中,我们可以呈现 UIViewControllers 以及新的 Flows。 函数 Flows.whenReady() 允许在新 Flow 准备好显示时触发,并返回其根 Presentable。
例如,从 WishlistFlow 中,我们在一个弹出窗口中启动 SettingsFlow。
private func navigateToSettings() -> FlowContributors {
	let settingsStepper = SettingsStepper()
	let settingsFlow = SettingsFlow(withServices: self.services, andStepper: settingsStepper)

    Flows.use(settingsFlow, when: .ready) { [unowned self] root in
        self.rootViewController.present(root, animated: true)
    }

    return .one(flowContributor: .contribute(withNextPresentable: settingsFlow, withNextStepper: settingsStepper))
    }
Flows.use(when:) 将 ExecuteStrategy 作为第二个参数。 它有两个可能的值
- .created:完成块将立即执行
- .ready:一旦子流(示例中的 SettingsFlow)发出了第一个 step,就会执行完成块
对于更复杂的情况,请参阅 DashboardFlow.swift 和 SettingsFlow.swift 文件,我们在其中处理 UITabBarController 和 UISplitViewController。
协调过程非常简单,并且发生在 AppDelegate 中。
class AppDelegate: UIResponder, UIApplicationDelegate {

    let disposeBag = DisposeBag()
    var window: UIWindow?
    var coordinator = FlowCoordinator()
    let appServices = AppServices()

    func application(_ application: UIApplication,
                     didFinishLaunchingWithOptions launchOptions: [UIApplicationLaunchOptionsKey: Any]?) -> Bool {

        guard let window = self.window else { return false }

        // listening for the coordination mechanism is not mandatory, but can be useful
        coordinator.rx.didNavigate.subscribe(onNext: { (flow, step) in
            print ("did navigate to flow=\(flow) and step=\(step)")
        }).disposed(by: self.disposeBag)

        let appFlow = AppFlow(withWindow: window, andServices: self.appServices)
        self.coordinator.coordinate(flow: self.appFlow, with: AppStepper(withServices: self.appServices))

        return true
    }
}
作为奖励,FlowCoordinator 提供了一个 Rx 扩展,允许您跟踪导航操作(FlowCoordinator.rx.willNavigate 和 FlowCoordinator.rx.didNavigate)。
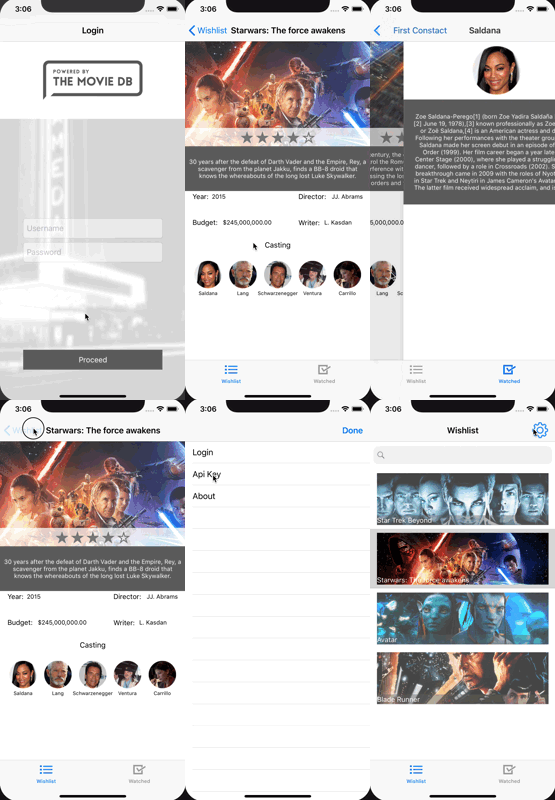
提供了一个演示应用程序来说明核心机制。 几乎解决了每种导航方式。 该应用程序包括
- 一个 AppFlow,代表主要导航。 此 Flow 将根据用户的“onboarding state”处理 OnboardingFlow 和 DashboardFlow。
- 一个 OnBoardingFlow,代表 UINavigationController 中的一个 2 步 onboarding 向导。 它只会在使用该应用程序的第一次显示。
- 一个 DashboardFlow,处理 WishlistFlow 和 WatchedFlow 的 Tabbar。
- 一个 WishlistFlow,代表您想要观看的电影的导航堆栈。
- 一个 WatchedFlow,代表您已经看过的电影的导航堆栈。
- 一个 SettingsFlow,以主/细节方式呈现用户的偏好设置。

RxFlow 依赖于
- SwiftLint 进行静态代码分析 ( Github SwiftLint )
- RxSwift 将 Steps 作为 Coordinator 可以响应的 Observables 公开 ( Github RxSwift )
- Reusable 在演示应用程序中使用,以简化 Storyboard 拆分成原子性 ViewController 的过程 ( Github Reusable )