

轻松扩展任何项目,使其包含智能设计组件浏览器。

Y—组件浏览器基于 Apache 2.0 许可证发布。
文档从源代码注释自动生成,并呈现为静态网站,托管在 GitHub Pages 上:https://yml-org.github.io/YComponentBrowser/
分类是一组共享共同特征的组件的集合。一个分类可以包含子分类。默认情况下,组件以嵌套表格视图布局,每个组件由单行表示。CatalogDisplayView 用于在单行中显示组件。它显示小型组件,以及标题和可选的详细描述。这用于图标、字体和颜色,但也适用于较小的组件,例如按钮。通过使用泛型,CatalogDisplayView 可以显示任何视图(用关联的模型填充)。该框架包含用于显示常见组件的预定义分类:颜色、字体和图标。
目录显示视图模型有四个参数
title: 标题detail: 详细描述 (可选),默认为nilaxis: 内容视图的主轴,默认为.horizontalmodel: 用于填充内容视图的模型
通过使用 CustomCategory,可以显示更大的组件,例如卡片视图。每个自定义组件可以单独占据一行。
对于更大的组件,例如视图控制器,我们可以跳过表格视图控制器,并在全屏上单独显示组件。这可以通过定义符合 Classification 和 Destination 协议的自定义分类和目标来实现。
我们可以通过声明 ColorCategory 对象来显示颜色
let category = ColorCategory(
    name: "Easter",
    models: [
        .init(
            title: "Purple",
            detail: "HEX: #D9D7F1",
            model: UIColor(red: 217/255, green: 215/255, blue: 241/255, alpha: 1)
        ),
        .init(
            title: "Light Yellow",
            detail: "HEX: #FFFDDE",
            model: UIColor(red: 1, green: 253/255, blue: 222/255, alpha: 1)
        )
    ]
)
您需要指定
name: 颜色分类名称models: 要显示的颜色的信息

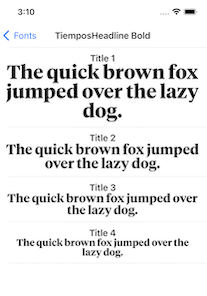
我们可以通过声明 FontCategory 对象来显示字体
let category = FontCategory(
    name: "TiemposHeadline Bold",
    models: [
        .init(
            title: "Title 1",
            model: FontView.Model(
                font: UIFont(name: "TiemposHeadline-Bold", size: 36)!
            )
        ),
        .init(
            title: "Title 2",
            model: FontView.Model(
                font: UIFont(name: "TiemposHeadline-Bold", size: 26)!
            )
        )
    ]
)
您需要指定
name: 字体分类名称models: 要显示的字体的信息
我们可以通过声明 IconCategory 对象来显示图标
let category = IconCategory(
    name: "Media",
    models: [
        .init(
            title: "Play",
            model: UIImage(systemName: "play.fill")!
        ),
        .init(
            title: "Pause",
            model: UIImage(systemName: "pause.fill")!
        )
    ]
)
您需要指定
name: 图标分类名称models: 要显示的图标的信息

我们可以通过声明 CatalogCategory 对象来显示嵌套的子分类
let category = CatalogCategory(
    name: "Foundational",
    subcategories: [
        ColorSample.category,
        IconSample.category,
        FontSample.category
    ]
)
您需要指定
name: 分类名称subcategories: 子分类的数组

我们可以通过声明利用 CatalogDisplayView 的 CustomCategory 对象来显示小型自定义组件(例如按钮)
let category = CustomCategory<CatalogDisplayView<DemoButton>>(
    name: "Demo Button",
    models: [
        .init(
            title: "Login",
            model: .init(
                backgroundColor: .systemBlue,
                title: "Login",
                titleColor: .white
            )
        ),
        .init(
            title: "Logout",
            model: .init(
                backgroundColor: .systemRed,
                cornerRadius: 25,
                title: "Logout",
                titleColor: .white
            )
        ),
    ]
)
您需要指定
name: 分类名称models: 要显示的组件的信息(在本例中为按钮)

我们可以通过声明直接使用要显示的视图的 CustomCategory 对象来显示中等大小的自定义组件(例如卡片或笔记)
let category = CustomCategory<NoteView>(
    name: "Demo View",
    models: [
        NoteView.Model(
            title: "Grocery List",
            body: "1) apples\n 2) sugar\n 3) coffee\n 4)snacks",
            backgroundColor: .systemYellow
        ),
        NoteView.Model(
            title: "Todo List",
            body: ""1)Buy Grocery\n 2)Prepare meal\n 3) Call a friend\n "",
            backgroundColor: .systemYellow
        )
    ]
)
您需要指定
name: 分类名称models: 要显示的组件的信息(在本例中为笔记)

为了显示大型自定义组件(包括全屏视图,甚至视图控制器),我们需要
- 创建一个自定义目标,该目标返回要呈现的视图控制器。如果您的组件不是视图控制器,这将是一个包含您的组件的视图控制器。
struct CarouselDestination: Destination {
    let navigationTitle: String?

    let presentationStyle: Presentation = .detail

    func getDestinationController() -> UIViewController {
        CarouselDemoViewController(navigationTitle: navigationTitle)
    }
}
- 为该特定视图控制器创建一个自定义分类
struct CarouselCategory: Classification {
    let name: String

    var destination: Destination {
        CarouselDestination(navigationTitle: name)
    }
}
- 声明分类的实例
let category = CarouselCategory(name: "Carousel Demo View Controller")

我们使用 语义化版本控制。
{major}.{minor}.{patch}
例如。
1.0.5
我们为我们的框架采用简化的分支策略。
- 主 (和开发) 分支是
main - feature (和 bugfix) 分支都从
main分支分出 - feature (和 bugfix) 分支在完成并获得批准后,合并回
main。 main会为每个发布版本标记更新的版本号。
feature/{ticket-number}-{short-description}
bugfix/{ticket-number}-{short-description}
例如。
feature/CM-44-button
bugfix/CM-236-textview-color
在提交拉取请求之前,您应该
- 编译并确保没有警告和错误(包括来自 SwiftLint 的警告)。
- 运行所有单元测试并确认一切通过。
- 检查单元测试覆盖率,并确认所有新的/修改的代码都完全覆盖。
- 从命令行运行
jazzy并确认您有 100% 的文档覆盖率。 - 考虑使用
git rebase -i HEAD~{commit-count}将您最后的 {commit-count} 次提交合并成功能块。 - 如果父分支(通常是
main)的 HEAD 在您创建分支后已更新,请使用git rebase main来 rebase 您的分支。- 永远不要将父分支合并到您的分支中。
- 始终将您的分支 rebase 到父分支上。
提交拉取请求时
- 使用提供的拉取请求模板,并至少填充 Introduction、Purpose 和 Scope 字段。
- 如果您要提交前后截图、电影或 GIF,请将它们输入到两列表格中,以便可以并排查看它们。
合并拉取请求时
- 确保分支已从父分支的最新 HEAD rebase(而不是合并)。这使我们的 git 历史易于阅读和理解。
- 确保在合并时删除该分支(应该是自动的)。
- 使用新版本标记相应的提交(例如
1.0.5) - 将本地标签推送到远程
brew install swiftlint
sudo gem install jazzy
在 Xcode 中打开 Package.swift。
您可以使用以下 Terminal 命令直接从源代码生成您自己的本地文档集
jazzy
这会在 /docs 下生成一组文档。默认配置在默认配置文件 .jazzy.yaml 中设置。
要查看其他文档选项,请键入
jazzy --help
每次将提交推送到 main 时,GitHub Action 都会自动运行,运行 Jazzy 以生成我们 GitHub 页面上的文档:https://yml-org.github.io/YComponentBrowser/