![]()
AsyncGraphics 是一个 Swift 包,用于使用 async / await 处理图像和视频。核心类型简称为 Graphic,它就像一个图像,并且由一个 MTLTexture 提供支持。
文档 (DocC)
查看 Graphic 文档以了解所有效果。
资源: 图像 (Image), 视频 (Video), 相机 (Camera), 地图 (Maps), 屏幕 (Screen), 文本 (Text), 视图 (View)
形状: 圆形 (Circle), 矩形 (Rectangle), 弧形 (Arc), 多边形 (Polygon), 星形 (Star), 线条 (Line)
纯色: 颜色 (Color), 渐变 (Gradient), 噪点 (Noise), Metal 代码 (Metal)
粒子: UV 粒子 (UV Particles), UV 彩色粒子 (UV Color Particles)
直接: 模糊 (Blur), 缩放模糊 (Zoom Blur), 角度模糊 (Angle Blur), 圆形模糊 (Circle Blur), 彩虹模糊 (Rainbow Blur), 随机模糊 (Random Blur), 通道混合 (Channel Mix), 色度键 (Chroma Key), 钳制 (Clamp), 颜色转换 (Color Convert), 色相 (Hue), 饱和度 (Saturation), 单色 (Monochrome), 着色 (Tint), 角钉 (Corner Pin), 边缘 (Edge), 万花筒 (Kaleidoscope), 亮度 (Brightness), 对比度 (Contrast), 伽马 (Gamma), 反转 (Inverted), 不透明度 (Opacity), 变形 (Morph), 像素化 (Pixelate), 量化 (Quantize), 锐化 (Sharpen), 斜率 (Slope), 阈值 (Threshold), 偏移 (Offset), 旋转 (Rotate), 缩放 (Scale), Metal 代码 (Metal)
双重: 混合 (Blend), 交叉 (Cross), 位移 (Displace), 查找 (Lookup), 亮度模糊 (Luma Blur), 亮度彩虹模糊 (Luma Rainbow Blur), 亮度色相 (Luma Hue), 亮度饱和度 (Luma Saturation), 亮度亮度 (Luma Brightness), 亮度对比度 (Luma Contrast), 亮度伽马 (Luma Gamma), 亮度平移 (Luma Translate), 亮度旋转 (Luma Rotate), 亮度缩放 (Luma Scale), 重映射 (Remap), Metal 代码 (Metal)
数组: HStack (水平堆叠), VStack (垂直堆叠), ZStack (Z 轴堆叠), 图层 (Layers), Metal 代码 (Metal)
技术: 添加 (Add), 平均 (Average), 位 (Bits), 颜色空间 (Color Space), 裁剪 (Crop), 检查 (Inspect), 极坐标 (Polar), 减少 (Reduce), 调整大小 (Resize), 坐标空间 (Coordinate Space), LUT
.package(url: "https://github.com/heestand-xyz/AsyncGraphics", from: "3.0.0")
在 AsyncGraphics 中,有几种方法可以呈现图形。
- AGView 用于声明式地查看 AGGraphs
- GraphicView 用于命令式地查看 Graphics
- AsyncGraphicView 用于异步地命令式地查看 Graphics。
- Graphic3DView 用于查看 Graphic3Ds
import AsyncGraphics

struct ContentView: View {
    var body: some View {
        AsyncGraphicView { resolution in
            try await .circle(resolution: resolution)
        }
    }
}

首先我们创建一个 AGView,这是所有 AGGraphs 的容器。在这个例子中,我们有一个 AGZStack,其中包含 3 个 AGHStacks。每个图形都有一个混合模式 (AGBlendMode),在本例中是 .screen。
import SwiftUI
import AsyncGraphics

struct ContentView: View {
    var body: some View {
        AGView {
            AGZStack {
                AGHStack {
                    AGSpacer()
                    AGCircle()
                        .foregroundColor(.red)
                }
                AGHStack {
                    AGSpacer()
                    AGCircle()
                        .foregroundColor(.green)
                    AGSpacer()
                }
                .blendMode(.screen)
                AGHStack {
                    AGCircle()
                        .foregroundColor(.blue)
                    AGSpacer()
                }
                .blendMode(.screen)
            }
        }
    }
}
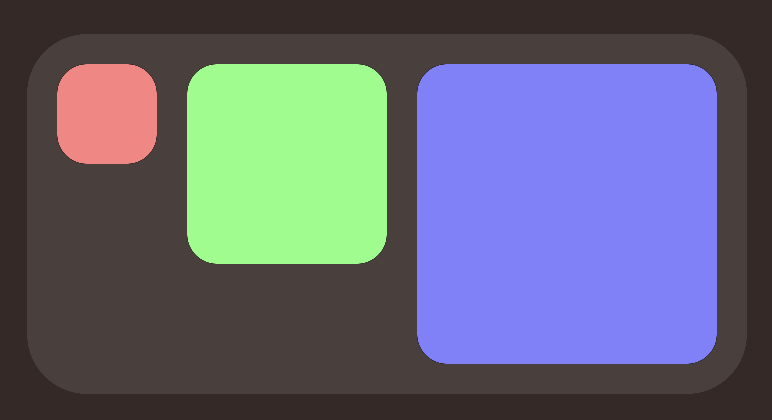
首先,我们创建一个 AGView,它是所有 AGGraph 的容器。 在此示例中,我们创建一个 AGHStack 来包含我们的框,然后我们使用 AGForEach 循环 3 次,计算宽度并创建 AGRoundedRectangles。 之后,我们设置 frame 以获得固定大小并应用颜色。 在堆栈之后,我们应用一些填充,最后添加背景。
import SwiftUI
import AsyncGraphics

struct ContentView: View {
    var body: some View {
        AGView {
            AGHStack(alignment: .top, spacing: 15) {
                AGForEach(0..<3) { index in
                    let width = 50 * CGFloat(index + 1)
                    AGRoundedRectangle(cornerRadius: 15)
                        .frame(width: width, height: width)
                        .foregroundColor(Color(hue: Double(index) / 3,
                                               saturation: 0.5,
                                               brightness: 1.0))
                }
            }
            .padding(15)
            .background {
                AGRoundedRectangle(cornerRadius: 30)
                    .opacity(0.1)
            }
        }
    }
}
import SwiftUI
import AsyncGraphics

struct ContentView: View {

    var body: some View {
        AGView {
            AGZStack {
                AGCamera(.front)
                    .resizable()
                    .aspectRatio(contentMode: .fill)
                AGCircle()
                    .blendMode(.multiply)
            }
        }
    }
}
您也可以使用 Graphics 执行相同的操作
import SwiftUI
import AsyncGraphics

struct ContentView: View {

    @State private var graphic: Graphic?

    var body: some View {
        ZStack {
            if let graphic {
                GraphicView(graphic: graphic)
            }
        }
        .task {
            do {
                let resolution = CGSize(width: 1_000, height: 1_000)
                let circleGraphic: Graphic = try await .circle(radius: 500,
                                                               backgroundColor: .clear,
                                                               resolution: resolution)
                for await cameraGraphic in try Graphic.camera(.front) {
                    graphic = try await circleGraphic
                        .blended(with: cameraGraphic,
                                 blendingMode: .multiply,
                                 placement: .fill)
                }
            } catch {
                print(error)
            }
        }
    }
}
请记住设置 Info.plist 键
NSCameraUsageDescription"隐私 - 相机使用描述"
可以选择在 AsyncGraphics 中编写高级 metal 代码。 无需设置 pipeline。
颜色用 PixelColor 类型表示。
import PixelColor 使用十六进制值创建自定义颜色。
PixelColor 在 GitHub 上。