

![]()


SideMenu 需要您的帮助!如果您是一位技术娴熟的 iOS 开发者,并且希望帮助维护此存储库并回答社区提出的问题,请发送邮件给我。
大家好,我是 Jon Kent,我是一名 iOS 设计师、开发者和移动策略师。我喜欢咖啡和打鼓。
SideMenu 是一个用 Swift 编写的简单而通用的侧边菜单控件。
- 它可以在 Storyboard 中实现,无需编写任何代码。
- 八种标准动画样式可供选择(如果你想变得奇怪,甚至还有视差效果)。
- 高度可定制,无需编写大量自定义代码。
- 支持在单个手势中在两侧的侧边菜单之间连续滑动。
- 全局菜单配置。设置一次即可完成所有屏幕的设置。
- 菜单可以像任何其他视图控制器一样呈现和解除,因为此控件使用自定义过渡。
- 动画使用您的视图控制器,而不是快照。
- 正确处理屏幕旋转和通话中状态栏高度变化。
查看示例项目,了解它的实际效果!
| 滑出 (Slide Out) | 滑入 (Slide In) | 溶解 (Dissolve) | 滑入 + 滑出 (Slide In + Out) |
|---|---|---|---|
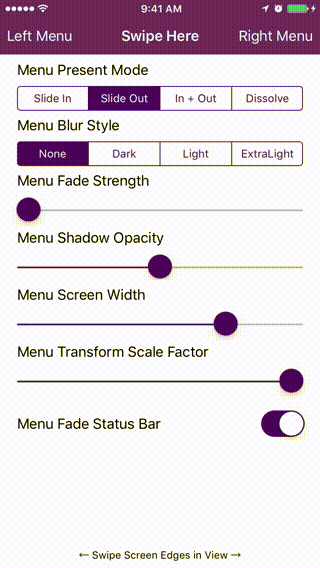 |
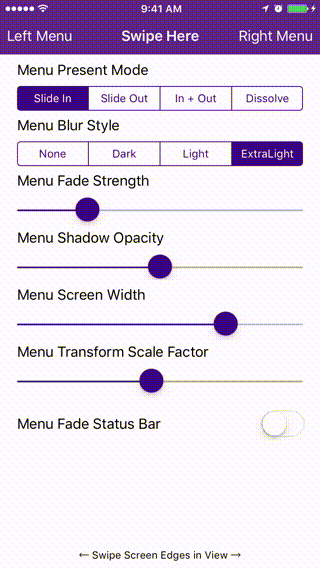 |
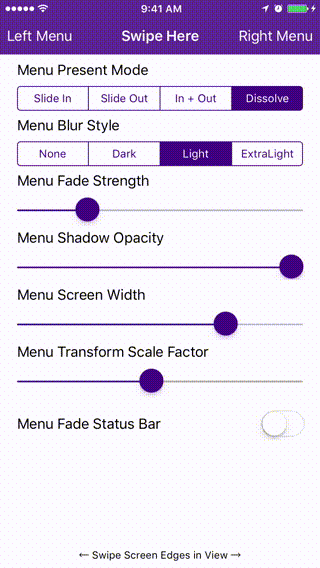 |
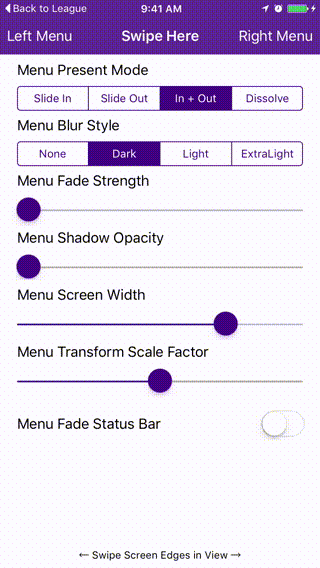 |
- Xcode 11.
- Swift 5.
- iOS 10 或更高版本。
CocoaPods 是 Cocoa 项目的依赖管理器。您可以使用以下命令安装它
$ gem install cocoapods
要使用 CocoaPods 将 SideMenu 集成到您的 Xcode 项目中,请在您的 Podfile 中指定它
source 'https://github.com/CocoaPods/Specs.git'
platform :ios, '10.0'
use_frameworks!

pod 'SideMenu'

# For Swift 5 use:
# pod 'SideMenu', '~> 6.0'

# For Swift 4.2 (no longer maintained) use:
# pod 'SideMenu', '~> 5.0'
然后,运行以下命令
$ pod install
Carthage 是一个去中心化的依赖管理器,它构建您的依赖项并为您提供二进制框架。
您可以使用 Homebrew 使用以下命令安装 Carthage
$ brew update
$ brew install carthage
要使用 Carthage 将 SideMenu 集成到您的 Xcode 项目中,请在您的 Cartfile 中指定它
github "jonkykong/SideMenu" "master"
Swift Package Manager 是一种用于自动分发 Swift 代码的工具,并已集成到 swift 编译器中。它处于早期开发阶段,但 SideMenu 确实支持在受支持的平台上使用它。
设置好 Swift 包后,将 SideMenu 添加为依赖项就像将其添加到 Package.swift 的 dependencies 值一样简单。
dependencies: [
    .package(url: "https://github.com/jonkykong/SideMenu.git", from: "6.0.0")
]
-
为侧边菜单创建一个导航控制器。在身份检查器中将导航控制器的
Custom Class设置为SideMenuNavigationController。将Module设置为SideMenu(如果您已手动将 SideMenu 添加到您的项目中,请忽略此步骤)。为导航控制器创建一个根视图控制器(如下所示的 UITableViewController)。在该视图控制器中设置您想要的任何触发 Segue。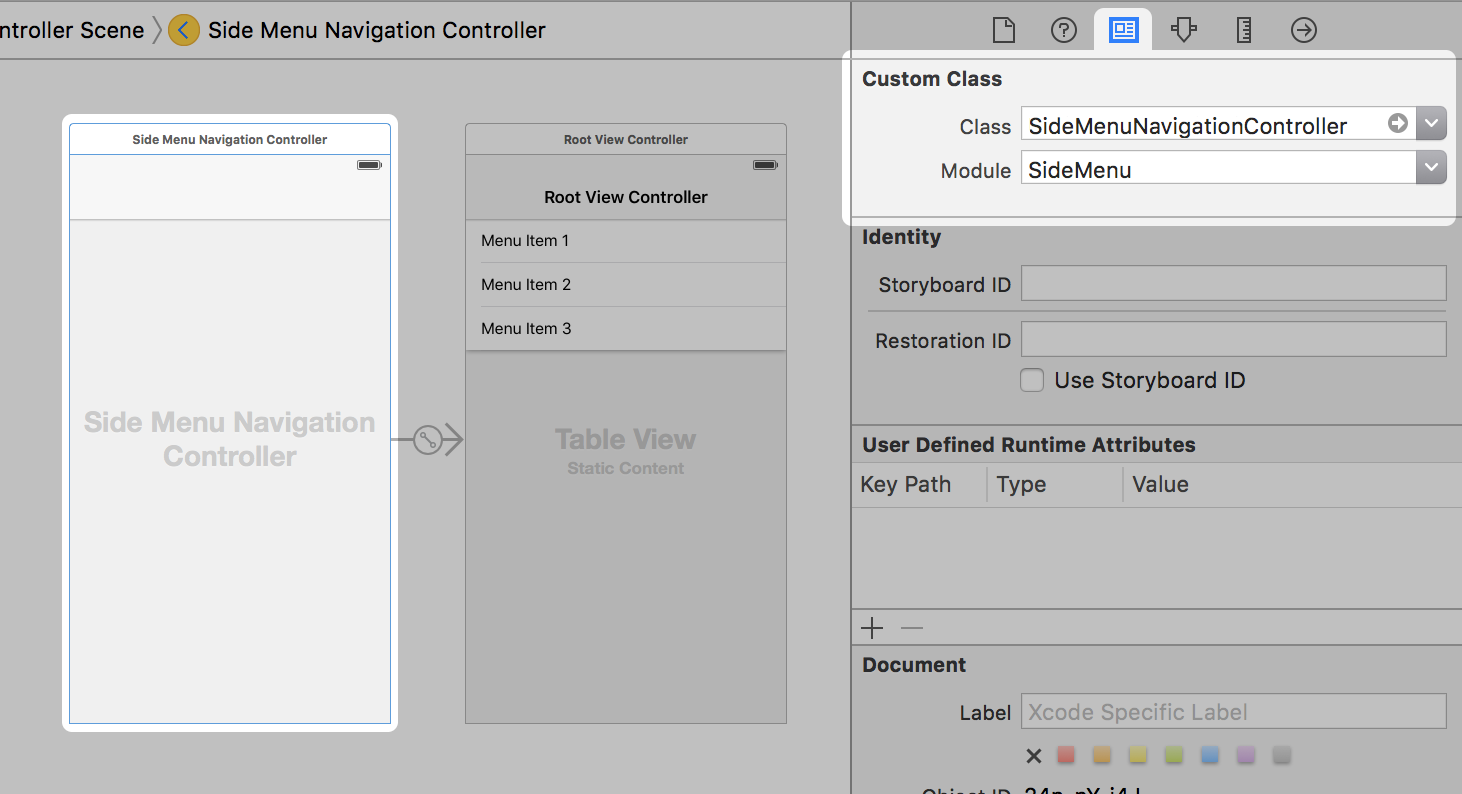
-
如果您希望
SideMenuNavigationController从屏幕的左侧出现,请将其Left Side属性设置为 On;如果您希望它从右侧出现,请设置为 Off/Default。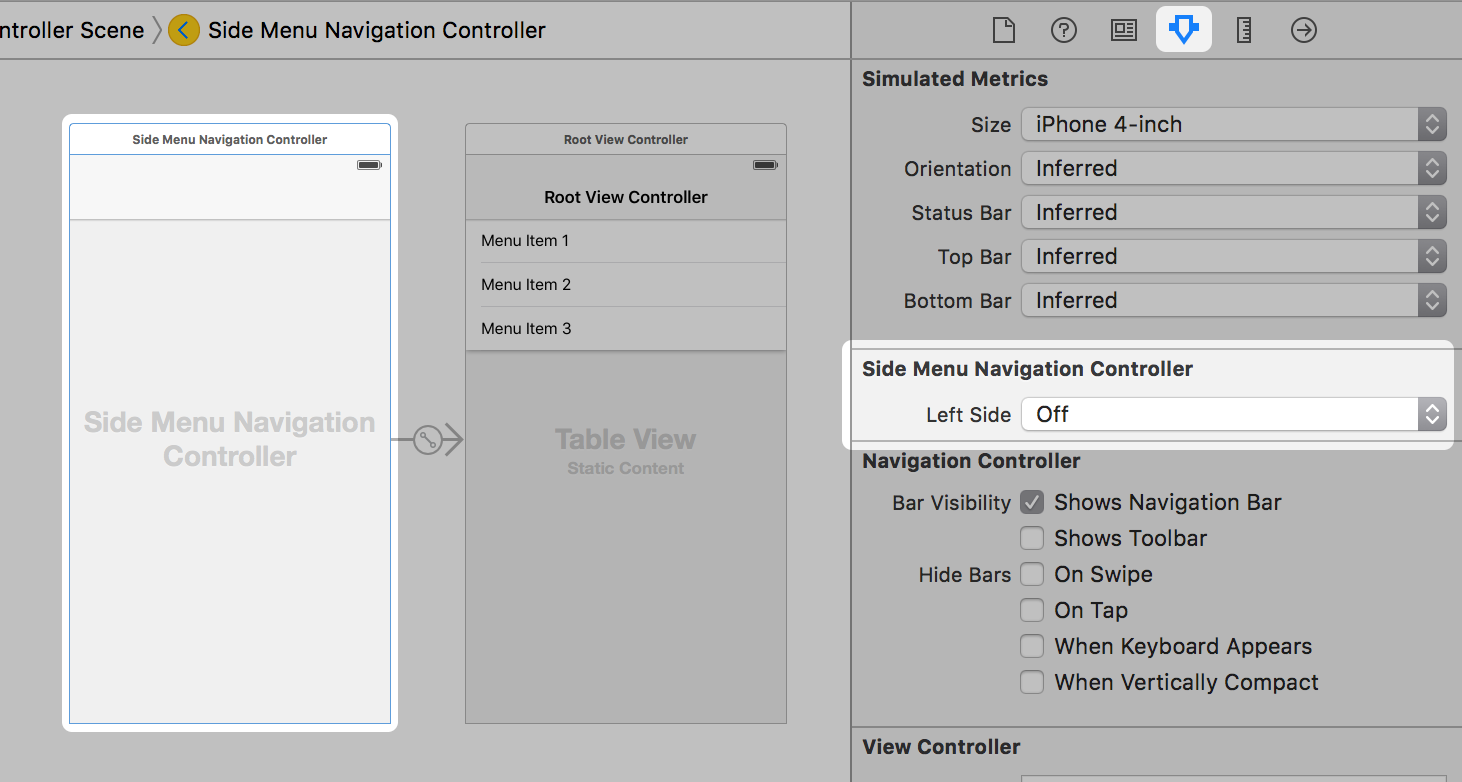
-
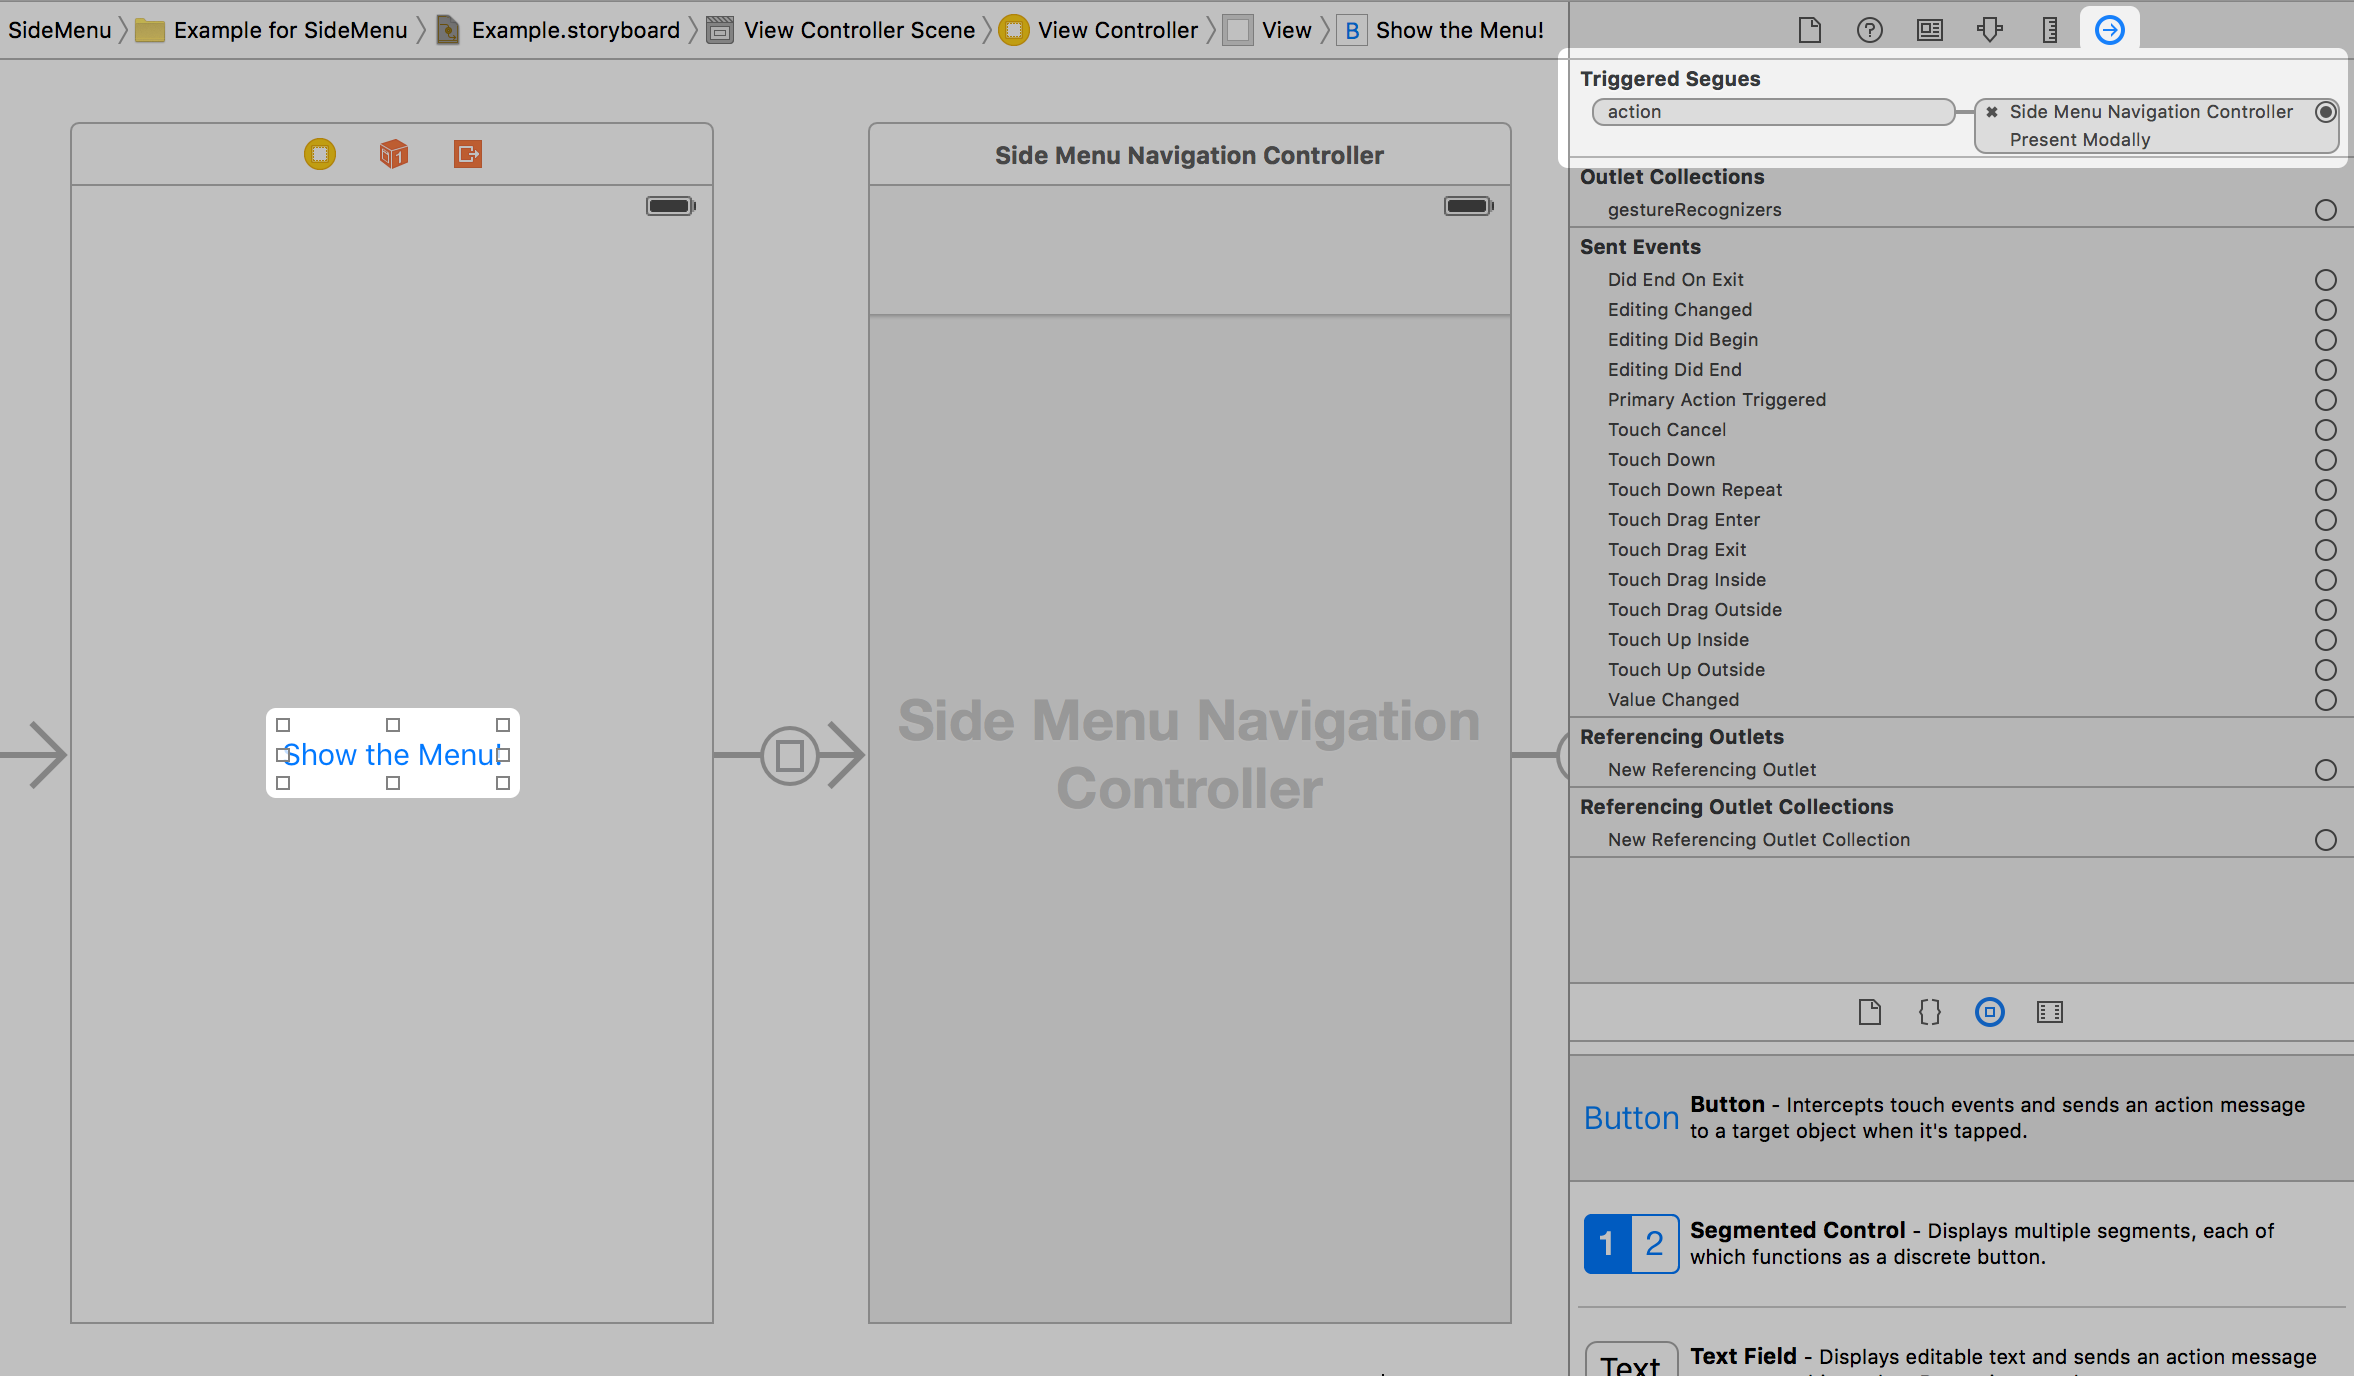
将 UIButton 或 UIBarButton 添加到您要从中显示菜单的视图控制器。将该按钮的触发 Segue 操作设置为以模态方式呈现步骤 1 中的导航控制器。
就这样。注意:您只能在代码中启用手势。
首先
import SideMenu
从一个按钮,做这样的事情
// Define the menu
let menu = SideMenuNavigationController(rootViewController: YourViewController)
// SideMenuNavigationController is a subclass of UINavigationController, so do any additional configuration
// of it here like setting its viewControllers. If you're using storyboards, you'll want to do something like:
// let menu = storyboard!.instantiateViewController(withIdentifier: "RightMenu") as! SideMenuNavigationController
present(menu, animated: true, completion: nil)
要以编程方式解除菜单,请执行以下操作
dismiss(animated: true, completion: nil)
要使用手势,您必须使用 SideMenuManager。在您的 AppDelegate 中,执行以下操作
// Define the menus
let leftMenuNavigationController = SideMenuNavigationController(rootViewController: YourViewController)
SideMenuManager.default.leftMenuNavigationController = leftMenuNavigationController

let rightMenuNavigationController = SideMenuNavigationController(rootViewController: YourViewController)
SideMenuManager.default.rightMenuNavigationController = rightMenuNavigationController

// Setup gestures: the left and/or right menus must be set up (above) for these to work.
// Note that these continue to work on the Navigation Controller independent of the view controller it displays!
SideMenuManager.default.addPanGestureToPresent(toView: self.navigationController!.navigationBar)
SideMenuManager.default.addScreenEdgePanGesturesToPresent(toView: self.navigationController!.view)

// (Optional) Prevent status bar area from turning black when menu appears:
leftMenuNavigationController.statusBarEndAlpha = 0
// Copy all settings to the other menu
rightMenuNavigationController.settings = leftMenuNavigationController.settings
就这样。
SideMenuManager 支持以下功能
/// The left menu.
open var leftMenuNavigationController: SideMenuNavigationController?
/// The right menu.
public var rightMenuNavigationController: SideMenuNavigationController?
/**
 Adds screen edge gestures for both left and right sides to a view to present a menu.

 - Parameter toView: The view to add gestures to.

 - Returns: The array of screen edge gestures added to `toView`.
 */
@discardableResult public func addScreenEdgePanGesturesToPresent(toView view: UIView) -> [UIScreenEdgePanGestureRecognizer]
/**
 Adds screen edge gestures to a view to present a menu.

 - Parameter toView: The view to add gestures to.
 - Parameter forMenu: The menu (left or right) you want to add a gesture for.

 - Returns: The screen edge gestures added to `toView`.
 */
@discardableResult public func addScreenEdgePanGesturesToPresent(toView view: UIView, forMenu side: PresentDirection) -> UIScreenEdgePanGestureRecognizer
/**
 Adds a pan edge gesture to a view to present menus.

 - Parameter toView: The view to add a pan gesture to.

 - Returns: The pan gesture added to `toView`.
 */
@discardableResult public func addPanGestureToPresent(toView view: UIView) -> UIPanGestureRecognizer
SideMenuNavigationController 支持以下功能
/// Prevents the same view controller (or a view controller of the same class) from being pushed more than once. Defaults to true.
var allowPushOfSameClassTwice: Bool = true
/// Forces menus to always animate when appearing or disappearing, regardless of a pushed view controller's animation.
var alwaysAnimate: Bool = true
/// The animation options when a menu is displayed. Ignored when displayed with a gesture.
var animationOptions: UIView.AnimationOptions = .curveEaseInOut
/**
 The blur effect style of the menu if the menu's root view controller is a UITableViewController or UICollectionViewController.

 - Note: If you want cells in a UITableViewController menu to show vibrancy, make them a subclass of UITableViewVibrantCell.
 */
var blurEffectStyle: UIBlurEffect.Style? = nil
/// Duration of the remaining animation when the menu is partially dismissed with gestures. Default is 0.35 seconds.
var completeGestureDuration: Double = 0.35
/// Animation curve of the remaining animation when the menu is partially dismissed with gestures. Default is .easeIn.
var completionCurve: UIView.AnimationCurve = .curveEaseInOut
/// Duration of the animation when the menu is dismissed without gestures. Default is 0.35 seconds.
var dismissDuration: Double = 0.35
/// Automatically dismisses the menu when another view is presented from it.
var dismissOnPresent: Bool = true
/// Automatically dismisses the menu when another view controller is pushed from it.
var dismissOnPush: Bool = true
/// Automatically dismisses the menu when the screen is rotated.
var dismissOnRotation: Bool = true
/// Automatically dismisses the menu when app goes to the background.
var dismissWhenBackgrounded: Bool = true
/// Enable or disable a swipe gesture that dismisses the menu. Will not be triggered when `presentingViewControllerUserInteractionEnabled` is set to true. Default is true.
var enableSwipeToDismissGesture: Bool = true
/// Enable or disable a tap gesture that dismisses the menu. Will not be triggered when `presentingViewControllerUserInteractionEnabled` is set to true. Default is true.
var enableTapToDismissGesture: Bool = true
/// The animation initial spring velocity when a menu is displayed. Ignored when displayed with a gesture.
var initialSpringVelocity: CGFloat = 1
/// Whether the menu appears on the right or left side of the screen. Right is the default. This property cannot be changed after the menu has loaded.
var leftSide: Bool = false
/// Width of the menu when presented on screen, showing the existing view controller in the remaining space. Default is zero.
var menuWidth: CGFloat = 240
/// Duration of the animation when the menu is presented without gestures. Default is 0.35 seconds.
var presentDuration: Double = 0.35
/// Enable or disable interaction with the presenting view controller while the menu is displayed. Enabling may make it difficult to dismiss the menu or cause exceptions if the user tries to present and already presented menu. `presentingViewControllerUseSnapshot` must also set to false. Default is false.
var presentingViewControllerUserInteractionEnabled: Bool = false
/// Use a snapshot for the presenting vierw controller while the menu is displayed. Useful when layout changes occur during transitions. Not recommended for apps that support rotation. Default is false.
var presentingViewControllerUseSnapshot: Bool = false
/// The presentation style of the menu.
var presentationStyle: SideMenuPresentStyle = .viewSlideOut
/**
 The push style of the menu.

 There are six modes in MenuPushStyle:
 - defaultBehavior: The view controller is pushed onto the stack.
 - popWhenPossible: If a view controller already in the stack is of the same class as the pushed view controller, the stack is instead popped back to the existing view controller. This behavior can help users from getting lost in a deep navigation stack.
 - preserve: If a view controller already in the stack is of the same class as the pushed view controller, the existing view controller is pushed to the end of the stack. This behavior is similar to a UITabBarController.
 - preserveAndHideBackButton: Same as .preserve and back buttons are automatically hidden.
 - replace: Any existing view controllers are released from the stack and replaced with the pushed view controller. Back buttons are automatically hidden. This behavior is ideal if view controllers require a lot of memory or their state doesn't need to be preserved..
 - subMenu: Unlike all other behaviors that push using the menu's presentingViewController, this behavior pushes view controllers within the menu.  Use this behavior if you want to display a sub menu.
 */
var pushStyle: MenuPushStyle = .default
/// Draws `presentationStyle.backgroundColor` behind the status bar. Default is 0.
var statusBarEndAlpha: CGFloat = 0
/// The animation spring damping when a menu is displayed. Ignored when displayed with a gesture.
var usingSpringWithDamping: CGFloat = 1
/// Indicates if the menu is anywhere in the view hierarchy, even if covered by another view controller.
var isHidden: Bool
有 8 个预定义的 SideMenuPresentStyle 选项
/// Menu slides in over the existing view.
static let menuSlideIn: SideMenuPresentStyle
/// The existing view slides out to reveal the menu underneath.
static let viewSlideOut: SideMenuPresentStyle
/// The existing view slides out while the menu slides in.
static let viewSlideOutMenuIn: SideMenuPresentStyle
/// The menu dissolves in over the existing view.
static let menuDissolveIn: SideMenuPresentStyle
/// The existing view slides out while the menu partially slides in.
static let viewSlideOutMenuPartialIn: SideMenuPresentStyle
/// The existing view slides out while the menu slides out from under it.
static let viewSlideOutMenuOut: SideMenuPresentStyle
/// The existing view slides out while the menu partially slides out from under it.
static let viewSlideOutMenuPartialOut: SideMenuPresentStyle
/// The existing view slides out and shrinks to reveal the menu underneath.
static let viewSlideOutMenuZoom: SideMenuPresentStyle
要接收从视图控制器显示菜单时的通知,请使其遵循 SideMenuNavigationControllerDelegate 协议
extension MyViewController: SideMenuNavigationControllerDelegate {

    func sideMenuWillAppear(menu: SideMenuNavigationController, animated: Bool) {
        print("SideMenu Appearing! (animated: \(animated))")
    }

    func sideMenuDidAppear(menu: SideMenuNavigationController, animated: Bool) {
        print("SideMenu Appeared! (animated: \(animated))")
    }

    func sideMenuWillDisappear(menu: SideMenuNavigationController, animated: Bool) {
        print("SideMenu Disappearing! (animated: \(animated))")
    }

    func sideMenuDidDisappear(menu: SideMenuNavigationController, animated: Bool) {
        print("SideMenu Disappeared! (animated: \(animated))")
    }
}
注意:在 SideMenuNavigationController 上设置 sideMenuDelegate 属性是可选的。如果您的视图控制器遵循该协议,则将自动调用这些方法。
点击查看详情
为了简单起见,SideMenuManager.default 用作主要实例,因为大多数项目只需要一个跨所有屏幕的菜单。如果您需要使用手势显示不同的 SideMenu,例如从之前 SideMenu 呈现的模态视图控制器中,请执行以下操作
- 声明一个包含您的自定义
SideMenuManager实例的变量。如果您要在多个屏幕上使用菜单,您可能需要在全局范围内定义它并在您的 app delegate 中配置它。
let customSideMenuManager = SideMenuManager()
- 使用您的自定义实例设置和显示菜单,就像使用
SideMenuManager.default实例一样。 - 如果使用 Storyboard,请子类化您的
SideMenuNavigationController实例,并将其sideMenuManager属性设置为您的自定义实例。必须在调用viewDidLoad之前完成此操作
class MySideMenuNavigationController: SideMenuNavigationController {

    let customSideMenuManager = SideMenuManager()

    override func awakeFromNib() {
        super.awakeFromNib()

        sideMenuManager = customSideMenuManager
    }
}
或者,您可以从 segue 到您的 SideMenuNavigationController 的视图控制器中设置 sideMenuManager
override func prepare(for segue: UIStoryboardSegue, sender: Any?) {
    if let sideMenuNavigationController = segue.destination as? SideMenuNavigationController {
        sideMenuNavigationController.sideMenuManager = customSideMenuManager
    }
}
重要提示:不支持直接在彼此之上显示 SideMenu 实例。使用 menuPushStyle = .subMenu 来显示多级菜单。
如果您想创建自己的自定义演示样式,请创建 SideMenuPresentationStyle 的子类,并将菜单的 presentationStyle 设置为它
class MyPresentStyle: SideMenuPresentationStyle {

    override init() {
        super.init()
        /// Background color behind the views and status bar color
        backgroundColor = .black
        /// The starting alpha value of the menu before it appears
        menuStartAlpha = 1
        /// Whether or not the menu is on top. If false, the presenting view is on top. Shadows are applied to the view on top.
        menuOnTop = false
        /// The amount the menu is translated along the x-axis. Zero is stationary, negative values are off-screen, positive values are on screen.
        menuTranslateFactor = 0
        /// The amount the menu is scaled. Less than one shrinks the view, larger than one grows the view.
        menuScaleFactor = 1
        /// The color of the shadow applied to the top most view.
        onTopShadowColor = .black
        /// The radius of the shadow applied to the top most view.
        onTopShadowRadius = 5
        /// The opacity of the shadow applied to the top most view.
        onTopShadowOpacity = 0
        /// The offset of the shadow applied to the top most view.
        onTopShadowOffset = .zero
        /// The ending alpha of the presenting view when the menu is fully displayed.
        presentingEndAlpha = 1
        /// The amount the presenting view is translated along the x-axis. Zero is stationary, negative values are off-screen, positive values are on screen.
        presentingTranslateFactor = 0
        /// The amount the presenting view is scaled. Less than one shrinks the view, larger than one grows the view.
        presentingScaleFactor = 1
        /// The strength of the parallax effect on the presenting view once the menu is displayed.
        presentingParallaxStrength = .zero
    }

    /// This method is called just before the presentation transition begins. Use this to setup any animations. The super method does not need to be called.
    override func presentationTransitionWillBegin(to presentedViewController: UIViewController, from presentingViewController: UIViewController) {}
    /// This method is called during the presentation animation. Use this to animate anything alongside the menu animation. The super method does not need to be called.
    override func presentationTransition(to presentedViewController: UIViewController, from presentingViewController: UIViewController) {}
    /// This method is called when the presentation transition ends. Use this to finish any animations. The super method does not need to be called.
    override func presentationTransitionDidEnd(to presentedViewController: UIViewController, from presentingViewController: UIViewController, _ completed: Bool) {}
    /// This method is called just before the dismissal transition begins. Use this to setup any animations. The super method does not need to be called.
    override func dismissalTransitionWillBegin(to presentedViewController: UIViewController, from presentingViewController: UIViewController) {}
    /// This method is called during the dismissal animation. Use this to animate anything alongside the menu animation. The super method does not need to be called.
    override func dismissalTransition(to presentedViewController: UIViewController, from presentingViewController: UIViewController) {}
    /// This method is called when the dismissal transition ends. Use this to finish any animations. The super method does not need to be called.
    override func dismissalTransitionDidEnd(to presentedViewController: UIViewController, from presentingViewController: UIViewController, _ completed: Bool) {}
}
- 问题 #258。使用
presentingViewControllerUseSnapshot可以帮助保留体验。
特别感谢所有为这个库贡献使其变得更好的人。 感谢您的支持!
SideMenu 在 MIT 许可证下可用。 有关更多信息,请参见 LICENSE 文件。