![]()


仍处于开发的 Alpha 阶段!
EasyNodeEditor 是一个使用 SwiftUI 创建节点编辑器的库。我开发这个库的目标是尽可能少地展示内部复杂代码,以便开发者可以尽可能专注于节点创建。
(v0.1.0)
(v0.1.4)

创建一个类,并从 NodeModelBase 类继承。
class YourOutputNode: NodeModelBase {
}
创建输出变量。
为输出变量添加 @Output。
确保为所有输出变量添加 @objc 包装器。
对变量的命名没有限制。你可以随意命名变量,库将自动使用该名称在节点中显示。
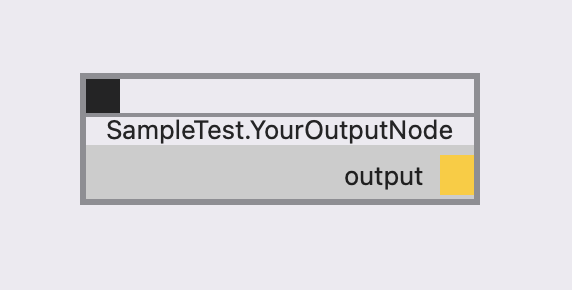
class YourOutputNode: NodeModelBase {
    @objc @Output var output: Int = 3
}
在实例化 EasyNodeEditor View 时注册你的节点。
struct ContentView: View {
    var body: some View {
        EasyNodeEditor(nodeTypes: [YourOutputNode.self])
    }
}
就是这样!
EasyNodeEditor 库将创建如下所示的节点。
创建一个类,并从 NodeModelBase 类继承。
class YourIONode: NodeModelBase {
}
创建输入和/或输出。
为输入变量添加 @Input,为输出变量添加 @Output。
确保为所有输入和输出变量添加 @objc 包装器。
对变量的命名没有限制。你可以随意命名变量,库将自动使用该名称在节点中显示。
class YourIONode: NodeModelBase {
    @objc @Input var input: Int = 0
    @objc @Output var output: Int = 0
}
重写 processOnChange() 函数,并定义你的处理过程。
不要在 processOnChange() 内部更改输入值。这会启动无限循环。
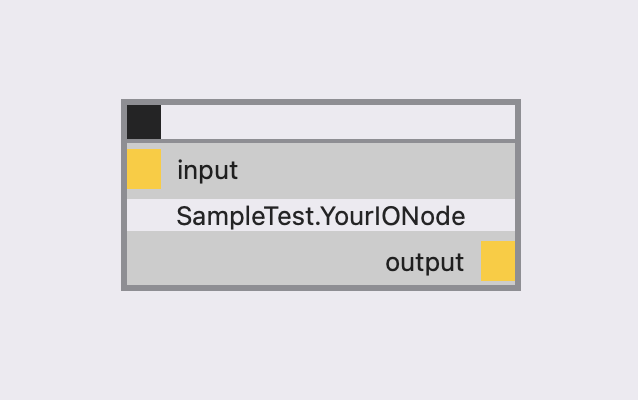
class YourIONode: NodeModelBase {
    @objc @Input var input: Int = 0
    @objc @Output var output: Int = 0
    override func processOnChange() {
        output = input * 5
    }
}
在实例化 EasyNodeEditor View 时注册你的节点。
struct ContentView: View {
    var body: some View {
        EasyNodeEditor(nodeTypes: [YourOutputNode.self, YoutIONode.self])
    }
}
非常简单!!
EasyNodeEditor 库将创建如下所示的节点。
创建一个类,并从 NodeModelBase 类继承。
class YourDisplayNode: NodeModelBase {
}
创建输入。
为输入变量添加 @Input。
确保为所有输入变量添加 @objc 包装器。
对变量的命名没有限制。你可以随意命名变量,库将自动使用该名称在节点中显示。
class YourDisplayNode: NodeModelBase {
    @objc @Input var input: Int = 0
}
重写 middleContent() 函数,并定义你的 View。
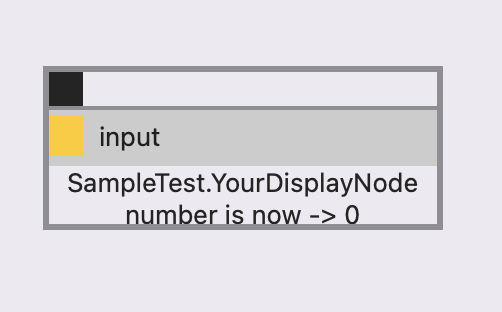
class YourDisplayNode: NodeModelBase {
    @objc @Input var input: Int = 0
    override func middleContent() -> any View {
        Text("number is now -> \(input)")
    }
}
在实例化 EasyNodeEditor View 时注册你的节点。
struct ContentView: View {
    var body: some View {
        EasyNodeEditor(nodeTypes: [YourOutputNode.self, YoutIONode.self, YourDisplayNode.self])
    }
}
太棒了!!
EasyNodeEditor 库将创建如下所示的节点。
我假设你已经阅读了这里的用法 1 ~ 3。
对于交互式节点,EasyNodeEditor 提供了 @Middle 属性包装器。
每当带有 @Input 或 @Middle 的变量值更改时,processOnChange() 函数将被触发。
如果你需要用于交互的绑定对象,请使用 binding 方法并传递 KeyPath 以获取绑定对象。
完成制作后,像往常一样注册你的节点。
class YourInteractiveNode: NodeModelBase {
    @objc @Input var input: Int = 0
    @objc @Middle var count: Int = 0
    @objc @Output var output: Int = 0
    override func processOnChange() {
        output = input * count
    }
    override func middleContent() -> any View {
        Group {
            Slider(value: binding(\YourInteractiveNode.count), in: 0...100)
        }
        .frame(minWidth: 200, maxWidth: 200)
        .fixedSize()
    }
}
简单!!
EasyNodeEditor 库将创建如下所示的节点。
import SwiftUI
import EasyNodeEditor

struct ContentView: View {
    var body: some View {
        EasyNodeEditor(nodeTypes: [YourOutputNode.self, YourIONode.self, YourDisplayNode.self, YourInteractiveNode.self])
    }
}

class YourOutputNode: NodeModelBase {
    @objc @Output var output: Int = 3
}

class YourIONode: NodeModelBase {
    @objc @Input var input: Int = 0
    @objc @Output var output: Int = 0
    override func processOnChange() {
        output = input * 5
    }
}

class YourDisplayNode: NodeModelBase {
    @objc @Input var input: Int = 0
    override func middleContent() -> any View {
        Text("number is now -> \(input)")
    }
}

class YourInteractiveNode: NodeModelBase {
    @objc @Input var input: Int = 0
    @objc @Middle var count: Int = 0
    @objc @Output var output: Int = 0
    override func processOnChange() {
        output = input * count
    }
    override func middleContent() -> any View {
        Group {
            Slider(value: binding(\YourInteractiveNode.count), in: 0...100)
        }
        .frame(minWidth: 200, maxWidth: 200)
        .fixedSize()
    }
}